Workbench height is one of those subjects which is often discussed by not very well explained, in my opinion anyway. The most common expert advice you see is that your bench should be low, around palm height. I followed that advice, my bench was too low and I ended up building plinths to raise it up 4". Even now, it is sometimes too low and I use a "bench raiser" that is 7" high, making the top almost a foot higher than my bench was originally.
The best discussion of workbench height that I have heard is this one by Shannon at The Renaissance Woodworker. Begin listening at 8:30. He correctly responds to the question of how high your workbench should be with the answer, "it depends." He refers to his main workbench as a dedicated planing bench which is at palm height, for him 33". He has a separate joinery bench at elbow height, 45" for him. For some joinery, like chopping mortises, he uses his main bench, or even a sawbench.
I think he's right and, while the specifics of my three choices are somewhat different, I have ended up in the same place. Of course, there are craftsman who do just fine working at one height and that's just fine too. They have found a workable compromise that suits them. My experience is that a low bench optimized for planing isn't great for other tasks.
There is a great deal of room for personal variation. My workbench up on plinths is 38", 4" above my palm height. I feel very comfortable planing at this height, but I am fairly strong and probably rely on my upper body more than most. Part of the issue for me is that my arms are very long, making palm height relatively low. I can readily believe that if I used wooden planes I would want it considerably lower than 38" though.
My bottom line is that workbench height is a matter of your body, your personal preferences, what tasks you are designing it for and probably other factors as well. In addition, I think that you should make provision for working at a variety of heights if you can. If you don't have room for a separate joinery bench like Shannon has, there are still good options like bench raisers.
Shannon's discussion of workholding is good too. As time has passed, he uses his end vise less and less, to the point that he says he wouldn't even have one if he were building his bench today, and relies on stops more and more. This was the traditional way and I agree with his reasoning as to why it is better. I have found the same thing. When I built my Nicholson bench, I started off without any vise at all, but I did eventually end up putting a Veritas twin screw vise on the end, though I still rely primarily on stops and bench hooks. I have seriously considered taking the vise off and using it for a Moxon vise on steroids that would live on the end of my eight foot long bench most of the time.
Why are stops preferable to using a vise? It is a lot more convenient to work on a piece without having to clamp and unclamp it, the piece doesn't slip, it rests solidly on the bench and it's faster, especially if you have multiple pieces to work on. Here is a nice description by Mike Pekovich of the stops he uses.
There are obviously other good approaches. Paul Sellers uses his vise for most of his work and gets great results. I just think the older, more traditional ways of workholding are better.

Showing posts with label Nicholson workbench. Show all posts
Showing posts with label Nicholson workbench. Show all posts
Thursday, November 3, 2016


Thursday, January 9, 2014
Plinths for my workbench
You may wonder what on earth plinths have to do with workbenches, so let me explain. If you read this blog regularly, you know that I believe I built my bench far too short based on the experts' advice and have been using it for some time jacked up on 4x6s. It works very well, but it is highly aggravating for me to be continually reminded of my mistake, so I determined to come up with something that would look better, if possible like I had designed the bench that way from the start.
I wandered around the internet looking for ideas and stumbled upon plinths. I learned that plinths constitute one of the major elements that make up architectural theory. They are viewed as creating a solid visual connection between the structure and the ground. Hey, I thought, that's what I need, a solid visual connection between my bench and the floor! Given the angular nature of my Nicholson bench, I thought angular plinths would look right, so here is what I came up with:


So, does it look like this is what I intended from the beginning and that I have introduced a major new element to workbench design and function? Well, during Peter Nicholson's lifetime Samuel Taylor Coleridge wrote about "suspension of disbelief." It would really help me if some of you would cut off the legs of your benches, put them up on plinths and send me pictures because you are so taken with this idea. I'm waiting in a state of suspended disbelief. :-(
I wandered around the internet looking for ideas and stumbled upon plinths. I learned that plinths constitute one of the major elements that make up architectural theory. They are viewed as creating a solid visual connection between the structure and the ground. Hey, I thought, that's what I need, a solid visual connection between my bench and the floor! Given the angular nature of my Nicholson bench, I thought angular plinths would look right, so here is what I came up with:
Hmmm. To me, it looks vaguely like my bench might stomp off in a huff. Well-- on the positive side, these are highly sophisticated "microadjustable plinths," meaning the wide molding on the top lets me fine tune the bench height with shims and compensate for the uneven floor in my garage. The plinths aren't attached to the bench so the moldings keep the legs from sliding off them. These plinths are also cross-cultural: they will work on a Roubo that is too short equally well!
So, does it look like this is what I intended from the beginning and that I have introduced a major new element to workbench design and function? Well, during Peter Nicholson's lifetime Samuel Taylor Coleridge wrote about "suspension of disbelief." It would really help me if some of you would cut off the legs of your benches, put them up on plinths and send me pictures because you are so taken with this idea. I'm waiting in a state of suspended disbelief. :-(
Thursday, December 19, 2013
Installing the Veritas Twin Screw Vise
As I discussed earlier, the directions for installing this vise strongly urge you to follow them exactly and precisely. Suitably intimidated, I began by drilling the 1 1/2" holes in the front and rear jaws, which in my case are 26"x7". Be aware that the minimum jaw depth is the thickness of your bench top plus 4 1/8", which will give you a throat depth of the thickness of your bench top plus 1". I made my jaws deeper than the minimum so I could have a little more than 3" of clearance.
The screws can be a maximum of 16 7/8" apart on center for the standard vise, which seemed fine for my 26" wide bench. This is where I dodged a bullet. The vise screws ended up clearing the insides of the 4" thick legs of my bench by 1/16"! "What do you not understand about the term 'on center'?" I muttered to myself when I realized what had happened. My point in revealing this lapse is that you should be more careful than I was in determining clearances unless you can depend on being similarly lucky and that you may not be able to get the full width between the screws if you mount it as an end vise, depending on the width of your bench and the thickness and location of its legs.
Great emphasis is placed on making sure that the holes for the screws are precisely aligned and parallel through careful use of a drill press. I added the extra precaution of using double stick tape to make sure that the jaws didn't move relative to one another as I drilled through both at once.
 Next you drill holes in the rear jaw for the steel pins that keep work pieces from coming into contact with the screws. Slightly larger clearance holes for the pins are drilled in the front jaw. Four bed bolts are supplied to mount the rear jaw to the bench and I chose to drill holes and counterbores for them on the drill press at the same time. The Nicholson bench makes for a very strong connection as I placed two of these bolts in the top and one near the bottom of the jaw into each skirt.
 After you drill the holes in the bench for the mounting bolts, you have to locate and drill a perpendicular hole for the round nuts. They tell you how to make an ingenious jig to do this easily which works very well:
 The challenge I had was there wasn't any way for me to reach these holes with the rear jaw in place. I solved this problem by installing the round nuts and holding them in place with wadded-up paper and blue tape while I threaded the bolts into them. Fortunately, this worked.
 Notice two other things. I had to drill clearance holes through the nearest transverse bearer to accommodate the vise screws. Second, notice the ledgers on which the bearer sits, which is glued and screwed on the bottom of the skirts. I decided to take advantage of this by adding a piece to the rear jaw to sit on them:
 Here is the rear jaw installed:
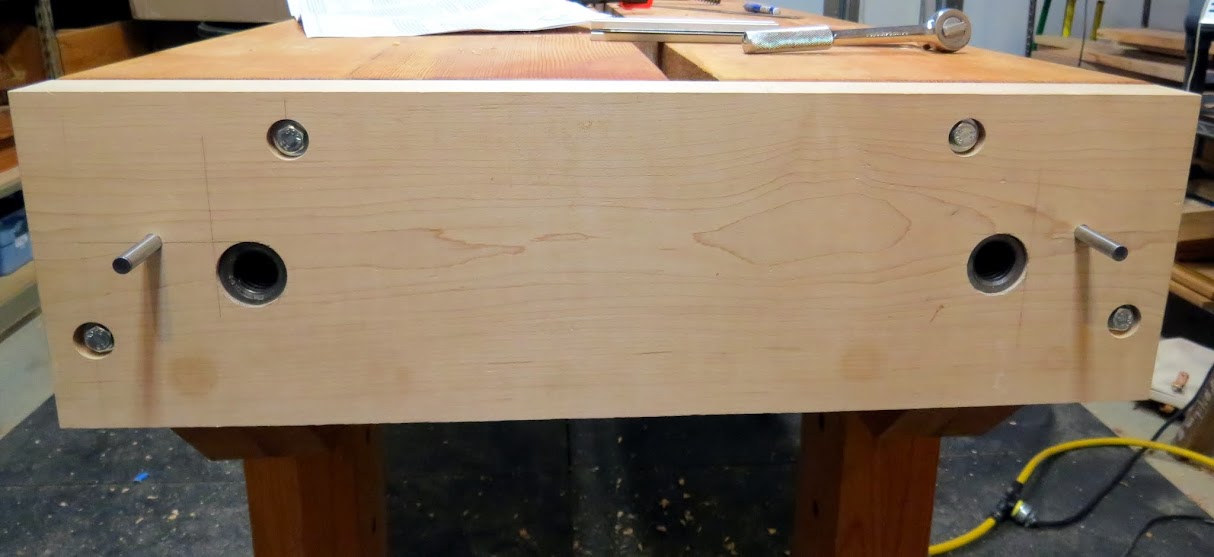 You then mount the thrust plates and screws to the front jaw and connect the chain:
 The final step is to install the front cover and handles:
 Careful attention to the directions paid off because the vise operates very smoothly. It is extremely powerful and easy to operate. I have used it a limited amount so far and really like it, but only time will tell whether mounting it as an end vise was the right decision. Guess I could buy a second one and mount it on the skirt!
The screws can be a maximum of 16 7/8" apart on center for the standard vise, which seemed fine for my 26" wide bench. This is where I dodged a bullet. The vise screws ended up clearing the insides of the 4" thick legs of my bench by 1/16"! "What do you not understand about the term 'on center'?" I muttered to myself when I realized what had happened. My point in revealing this lapse is that you should be more careful than I was in determining clearances unless you can depend on being similarly lucky and that you may not be able to get the full width between the screws if you mount it as an end vise, depending on the width of your bench and the thickness and location of its legs.
Great emphasis is placed on making sure that the holes for the screws are precisely aligned and parallel through careful use of a drill press. I added the extra precaution of using double stick tape to make sure that the jaws didn't move relative to one another as I drilled through both at once.
Thursday, December 12, 2013
Finally, a vise ...
installed in my bench. I haven't had one since I built my Nicholson bench several years ago, indecision that benefited me greatly as I have learned a lot about traditional ways of work holding that are often as good or better. I didn't know what I wanted and thought it would be just as easy to add a vise later (which I now don't think is true).
I would probably have gone on indefinitely without a bench vise were it not for a related decision. As I've posted before, I am 6'2" with long arms and I built my bench 34" high following the expert guidance I read at the time. The net result was that I did much of my work on a bench raiser and a Moxon vise on top of the bench. I wasn't comfortable working on the bench itself. It wasn't until I read several blog posts by Paul Sellers strongly arguing that the right bench height for someone my height is 38-40" that things changed. I put my bench up on 4x6 blocks as an experiment and was instantly convinced. I am not trying to convince you; all I am telling you is that for this woodworker he is absolutely right. Now that the bench is high enough for me, having a vise on the bench makes sense.
Having spent a lot of time thinking about vises and using a Moxon vise exclusively convinced me that a twin screw vise is right for me (which isn't to say it is for you). My first choice has always been to build one using the huge, beautiful wooden screws from Lake Erie Toolworks, but at $418 plus shipping and handling I just could never justify it. Were money no object, this is what I would do. They look great and are in keeping with the historical character of the Nicholson bench. I explored making my own wooden screws but, for various reasons, decided against it. As a result, I turned reluctantly to steel screws.
There are three ways to go with steel screws that I considered:

The next question was whether to mount it as an end vise or a front vise. Bob Rozaieski of The Logan Cabinet Shoppe installed a twin screw face vise on his Nicholson and I see a lot of advantages to using the skirt as the rear jaw. This is the traditional position for a vise on the Nicholson workbench. On the other hand, Lee Valley clearly thinks their vise works best as an end vise, I have used it that way at their booths and I liked it. A disadvantage is that it basically forces you to locate the bench away from a wall, but that is what I like anyway. The Nicholson bench design easily accommodates this vise on the end and I like keeping the skirts open. As I will explain, an end vise installation essentially fits my bench like a glove. I don't think I will ever again use a vise as much as most woodworkers do because I have gotten used to working without one for a lot of what I do and prefer it, so an out of the way location is fine for me. Knowing that it can be removed with almost no trace, I decided to try it as an end vise.
If it sounds like I am uncertain about all of this, it's because I am, but it was time to make a decision. I knew it would work great, but I wasn't sure it would look great on a Nicholson workbench and that bothered me a lot. In the end, I think that it is a tribute to the Nicholson design to see how well it accommodates new technology. In fact, I think the vise works better on a Nicholson that it does on Lee Valley's own bench. You'll see why in the next post.
The lengthy directions that come with the Lee Valley vise contain an admonition to follow them exactly stronger than anything I have encountered since my third grade teacher Miss Shults. Here is a sample: "It isn't a lot of fun to follow instructions exactly but this is one time when it will save you a lot of grief." The entire last page is taken up with a flowchart of what to do if the vise doesn't turn well after it's installed. I think the day job of the guy who wrote these instructions is machining Lee Valley's planes, because he has exacting standards of precision. I suspect the directions result from dealing with customers whose installations didn't go well but, having completed my installation, I think they are a bit overwrought. After all, the vise is designed to skew one full turn and you are directed to make the jaws 3/16" out of parallel, so there clearly is some tolerance. Nevertheless, the directions are clear and carefully written, so it is a good idea to pay attention to them. Worked for me.
I am writing a separate post with pictures about the installation. As for those of you who think this is a terrible thing to do to a Nicholson workbench, I understand where you are coming from.
I would probably have gone on indefinitely without a bench vise were it not for a related decision. As I've posted before, I am 6'2" with long arms and I built my bench 34" high following the expert guidance I read at the time. The net result was that I did much of my work on a bench raiser and a Moxon vise on top of the bench. I wasn't comfortable working on the bench itself. It wasn't until I read several blog posts by Paul Sellers strongly arguing that the right bench height for someone my height is 38-40" that things changed. I put my bench up on 4x6 blocks as an experiment and was instantly convinced. I am not trying to convince you; all I am telling you is that for this woodworker he is absolutely right. Now that the bench is high enough for me, having a vise on the bench makes sense.
Having spent a lot of time thinking about vises and using a Moxon vise exclusively convinced me that a twin screw vise is right for me (which isn't to say it is for you). My first choice has always been to build one using the huge, beautiful wooden screws from Lake Erie Toolworks, but at $418 plus shipping and handling I just could never justify it. Were money no object, this is what I would do. They look great and are in keeping with the historical character of the Nicholson bench. I explored making my own wooden screws but, for various reasons, decided against it. As a result, I turned reluctantly to steel screws.
There are three ways to go with steel screws that I considered:
- Just buy two steel screws like these. Inexpensive, straightforward, effective but the two screws operate independently;
- Buy the Lie Nielsen twin screw vise. Elegant, expensive, complex, seemingly difficult installation;
- Buy the Lee Valley Veritas twin screw vise. Less elegant, less expensive, less complex but still involved installation.
The next question was whether to mount it as an end vise or a front vise. Bob Rozaieski of The Logan Cabinet Shoppe installed a twin screw face vise on his Nicholson and I see a lot of advantages to using the skirt as the rear jaw. This is the traditional position for a vise on the Nicholson workbench. On the other hand, Lee Valley clearly thinks their vise works best as an end vise, I have used it that way at their booths and I liked it. A disadvantage is that it basically forces you to locate the bench away from a wall, but that is what I like anyway. The Nicholson bench design easily accommodates this vise on the end and I like keeping the skirts open. As I will explain, an end vise installation essentially fits my bench like a glove. I don't think I will ever again use a vise as much as most woodworkers do because I have gotten used to working without one for a lot of what I do and prefer it, so an out of the way location is fine for me. Knowing that it can be removed with almost no trace, I decided to try it as an end vise.
If it sounds like I am uncertain about all of this, it's because I am, but it was time to make a decision. I knew it would work great, but I wasn't sure it would look great on a Nicholson workbench and that bothered me a lot. In the end, I think that it is a tribute to the Nicholson design to see how well it accommodates new technology. In fact, I think the vise works better on a Nicholson that it does on Lee Valley's own bench. You'll see why in the next post.
The lengthy directions that come with the Lee Valley vise contain an admonition to follow them exactly stronger than anything I have encountered since my third grade teacher Miss Shults. Here is a sample: "It isn't a lot of fun to follow instructions exactly but this is one time when it will save you a lot of grief." The entire last page is taken up with a flowchart of what to do if the vise doesn't turn well after it's installed. I think the day job of the guy who wrote these instructions is machining Lee Valley's planes, because he has exacting standards of precision. I suspect the directions result from dealing with customers whose installations didn't go well but, having completed my installation, I think they are a bit overwrought. After all, the vise is designed to skew one full turn and you are directed to make the jaws 3/16" out of parallel, so there clearly is some tolerance. Nevertheless, the directions are clear and carefully written, so it is a good idea to pay attention to them. Worked for me.
I am writing a separate post with pictures about the installation. As for those of you who think this is a terrible thing to do to a Nicholson workbench, I understand where you are coming from.
Saturday, November 9, 2013
A response to Roubo regret-bench edition
Another blogger has recently written a post explaining why he is retiring his Nicholson bench in favor of a Roubo that he is now building. Before I respond, I want to emphasize that I think a Roubo workbench is an excellent choice with a number of advantages and I have no interest in arguing about whether a Nicholson bench or a Roubo bench is superior. They're both superior in my opinion. However, I do want to respond to some of the criticisms of the Nicholson design.
Despite the title of the blogger's post, many of the things he doesn't like about his existing bench aren't because it is a Nicholson. Both designs can be adapted to a wide variety of vise configurations. Both can be made different sizes. The two issues he writes about that seem most related to the Nicholson design are that he thinks the top is bouncy and doesn't work well with holdfasts and he doesn't like the aprons. These are the issues that I want to discuss,
The complaint that the top is bouncy on a Nicholson is one you hear frequently. I think it can be valid but that is entirely a matter of how it's designed and built. If you make the top from construction lumber and space the cross-members fairly widely, the top can in fact be bouncy in places. My personal view is that standard construction lumber 2x12s are too thin for the top, although I'll explain below how I think you can make one with them that would be very rigid. I made my Nicholson with full 2" vertical grain douglas fir and put cross-members every 14". It's rock solid with no detectable bounce at all; it just goes thump. Even though it's 8' long, I'd put it up against a 6' foot Roubo with a 4" top anytime. The main points I'm making are that you can make the top as rigid as you want by adding cross-members, which is very easy to do, and you can have a Nicholson with a top that is just as rigid as a Roubo. In fact, my claim is that a Nicholson bench using about the same number of board feet of material will be as or more rigid than a Roubo, particularly for a long bench. I believe that this flows directly from the properties of wood. For obvious reasons, a 12" skirt is highly resistant to flexing. If you add a 2x6 to the bottom half to support the cross-members it gets even stiffer. The flex is coming from the top. Adding cross-members limits it. As for holdfasts not working well in a 2" benchtop, my Gramercy holdfasts work great; I have never had any problem and I don't have any extra blocking. I think this is another reason to have a full 2" top though. Thick benchtops have the opposite problem and apparently have to be counterbored.
As for the skirts there are three criticisms that I have read:
The clamping difficulty was an issue raised by Chris Schwarz I think and I can't understand it at all. I clamp things to the top of my Nicholson bench all the time. It's true that you need clamps that span the width of the skirt, the top and whatever you are trying to clamp, but that's not a big issue to me. Alternatively, you can clamp on the ends of the bench and, if you have a split top, you can also clamp from the middle, something I do regularly.
I use the skirts on a regular basis and I am surprised that there are some woodworkers who don't. They're great when you are jointing the edge of a board. Roubo benches accomplish the same thing by having the legs in the same plane with the top and a sliding deadman. Whether you prefer a sliding deadman to a skirt is a matter of personal preference, I think. I like the fact that the skirts do double duty, as a structural element and for holding workpieces vertically. I can't imagine how you can think they are like "curtains on a dog house." What does he think a deadman is, a sliding door on a dog house?
I think that Nicholson benches are sometimes regarded as inferior to Roubo benches because the former are often made with construction lumber, use much less material, can be very inexpensive and can be made quickly and easily. Mike Siemsen has a nice one that he makes in a day. To me these are strong advantages in that they make a quality bench available to a broad range of woodworkers. A fair comparison between a Nicholson bench and a Roubo bench, though, is to make both with the same amount of material and the same craftsmanship.
This last observation points to the real issue in my strictly personal opinion. A Nicholson bench looks and is very utilitarian, functional, practical. A Roubo bench often exudes craftsmanship and style. This isn't to say that it's not highly functional, only to describe its appearance. It's better looking to many, particularly if the Nicholson bench is made from construction lumber. I made my bench from vertical grain douglas fir that had been rejected for millwork for minor imperfections. It looks great to me, standing there plain, capable, unpretentious.
Despite the title of the blogger's post, many of the things he doesn't like about his existing bench aren't because it is a Nicholson. Both designs can be adapted to a wide variety of vise configurations. Both can be made different sizes. The two issues he writes about that seem most related to the Nicholson design are that he thinks the top is bouncy and doesn't work well with holdfasts and he doesn't like the aprons. These are the issues that I want to discuss,
The complaint that the top is bouncy on a Nicholson is one you hear frequently. I think it can be valid but that is entirely a matter of how it's designed and built. If you make the top from construction lumber and space the cross-members fairly widely, the top can in fact be bouncy in places. My personal view is that standard construction lumber 2x12s are too thin for the top, although I'll explain below how I think you can make one with them that would be very rigid. I made my Nicholson with full 2" vertical grain douglas fir and put cross-members every 14". It's rock solid with no detectable bounce at all; it just goes thump. Even though it's 8' long, I'd put it up against a 6' foot Roubo with a 4" top anytime. The main points I'm making are that you can make the top as rigid as you want by adding cross-members, which is very easy to do, and you can have a Nicholson with a top that is just as rigid as a Roubo. In fact, my claim is that a Nicholson bench using about the same number of board feet of material will be as or more rigid than a Roubo, particularly for a long bench. I believe that this flows directly from the properties of wood. For obvious reasons, a 12" skirt is highly resistant to flexing. If you add a 2x6 to the bottom half to support the cross-members it gets even stiffer. The flex is coming from the top. Adding cross-members limits it. As for holdfasts not working well in a 2" benchtop, my Gramercy holdfasts work great; I have never had any problem and I don't have any extra blocking. I think this is another reason to have a full 2" top though. Thick benchtops have the opposite problem and apparently have to be counterbored.
As for the skirts there are three criticisms that I have read:
- They take up space that could be used for storage under the bench;
- The make it hard to clamp things to the top of the bench;
- You won't use them.
The clamping difficulty was an issue raised by Chris Schwarz I think and I can't understand it at all. I clamp things to the top of my Nicholson bench all the time. It's true that you need clamps that span the width of the skirt, the top and whatever you are trying to clamp, but that's not a big issue to me. Alternatively, you can clamp on the ends of the bench and, if you have a split top, you can also clamp from the middle, something I do regularly.
I use the skirts on a regular basis and I am surprised that there are some woodworkers who don't. They're great when you are jointing the edge of a board. Roubo benches accomplish the same thing by having the legs in the same plane with the top and a sliding deadman. Whether you prefer a sliding deadman to a skirt is a matter of personal preference, I think. I like the fact that the skirts do double duty, as a structural element and for holding workpieces vertically. I can't imagine how you can think they are like "curtains on a dog house." What does he think a deadman is, a sliding door on a dog house?
I think that Nicholson benches are sometimes regarded as inferior to Roubo benches because the former are often made with construction lumber, use much less material, can be very inexpensive and can be made quickly and easily. Mike Siemsen has a nice one that he makes in a day. To me these are strong advantages in that they make a quality bench available to a broad range of woodworkers. A fair comparison between a Nicholson bench and a Roubo bench, though, is to make both with the same amount of material and the same craftsmanship.
This last observation points to the real issue in my strictly personal opinion. A Nicholson bench looks and is very utilitarian, functional, practical. A Roubo bench often exudes craftsmanship and style. This isn't to say that it's not highly functional, only to describe its appearance. It's better looking to many, particularly if the Nicholson bench is made from construction lumber. I made my bench from vertical grain douglas fir that had been rejected for millwork for minor imperfections. It looks great to me, standing there plain, capable, unpretentious.
Thursday, November 1, 2012
Workbench height: a tall tale
Paul Sellers wrote a post recently in which he states emphatically that 38 inches is the correct workbench height for an average hand tool woodworker and that it should be higher for a taller woodworker. Since I am almost 6' 3", the implication is that my bench should be about 40" high! He asserts that this is based on long experience and regards it as an established fact.
Does it matter? Yes, it does. It is hard to think of any ergonomic choice that is more significant for a hand tool woodworker and my experience is that it matters a whole lot. You will be standing or sitting at this bench for many hours. Is this recommendation controversial? Yes, it is. This is dramatically higher than most of the recommendations I read when I was building my bench, Chris Schwarz's in particular. He wrote the books on the subject after all.
My Nicholson bench, which I am incredibly happy with, is 34" high based on these expert recommendations. This is the one thing I might change because I have found it to be too low. But 40"?
As I have thought about it, this recommendation for a high bench isn't as radical as it first sounds. Paul Sellers works on a vise attached to the bench. I use a Moxon vise that is 6" higher than the bench. He does his fine joinery work on the benchtop. I do mine on a bench raiser that is 7" tall. I am doing much of my work at the height he recommends.
Here is another perspective: In the 17th and 18th century, the average male height was about 5'6" and Nicholson describes a bench height of about 32". Maintaining the same ratio, my bench should be 36".
Here is another perspective: In the 17th and 18th century, the average male height was about 5'6" and Nicholson describes a bench height of about 32". Maintaining the same ratio, my bench should be 36".
It is interesting to look at the height of the better commercial workbenches. Here's what Lie-Nielsen says about theirs:
HEIGHT: Most benches currently on the market are about 35” (88.9cm) high. For many people today, a taller bench is more comfortable. We can make your bench up to 38” (96.52cm) high.
The standard recommendation for a low workbench seems to be based on what is considered optimal for planing. I think it might be if you are using wooden planes to prepare rough stock. I use mainly vintage Stanley planes for this work and that's probably 3" difference right there. They are thinner and heavier, which means that they require less downward force. I find myself crouching a bit when I use a #7, probably because I want more horizontal force and less vertical force. It is also more comfortable for my wrist on the tote.
I am not trying to convince anyone to work at a tall bench. My purpose is to point out the broad range of expert opinion and suggest that you take the time to make your own decision based on a trial. Find something you can work on, get some blocks, raise and lower it as you try a variety of operations and see what is comfortable. If you use a Moxon vise and/or a bench raiser, try them.
I decided to experiment by putting some 4"x6" blocks under the legs of my bench. My initial reaction is extremely positive; 38" feels very natural. I've been cutting some dovetails with my Moxon vise and the extra 4" means I bend over less and the improved posture seems to allow me to work with more accuracy I am going to give it a few weeks before reaching any conclusions, experimenting with other heights as well. I'm really curious to see what 40" is like. Raising my bench height permanently is not as bad as it sounds; I am already thinking of designs that will look good.
Workbench height is a compromise among ideal heights for various operations, differences in tools used and individual preferences. I doubt that there are viable rules. Make your own decision.
Workbench height is a compromise among ideal heights for various operations, differences in tools used and individual preferences. I doubt that there are viable rules. Make your own decision.
Thursday, December 15, 2011
Finish for workbenches
There are a number of opinions regarding the appropriate finish to put on workbenches. The main alternatives recommended seem to be:
- No finish
- Watco Danish Oil
- boiled linseed oil
- wax
- A mixture of turpentine, beeswax and boiled linseed oil
- Waterlox
- a mixture of spar varnish, mineral spirits and boiled linseed oil.
I chose 7, in part because I had the ingredients on hand and in part because I thought it would provide the best protection for the bench. This is what Lie Nielsen uses on their benches. My main concern was that it would make the surface slippery and interfere with workholding. I avoided polyurethane varnish for that reason. I applied one thick coat and am happy to report that it worked well. With my eyes closed, I cannot tell the difference between a bare surface and a surface that this mixture has been applied to. It is not slippery. I will not be waxing it.
As you can tell from the picture below, the finish produced an amber tint on the douglas fir and really brought out the color differences that were present in the wood. The picture was taken right after the finish was applied and the sheen has since disappeared.
I'm happy with the choice so far. We'll see how it holds up.
Tuesday, December 13, 2011

Observation #4
It is very important to make sure the tops of the sideboards are coplanar as soon as they are attached to the leg assemblies and prior to the installation of the bearers. Maybe this is obvious, but I was very fortunate to pay close attention to it, as detailed previously. I introduced about 1/8" of wind during assembly. I was . . . displeased. The great thing about the Nicholson design and handtools is you can fix it. I used my jointer to carefully bring them back into planarity. Then, when I installed the bearers, I planed them flat to the sideboards. The payoff for me was this: When I installed the top boards, they were dead flat. To my amazement, I am done, ready for finish. No flattening of the top boards is required!

What was my mistake? I planed the sideboards perfectly even with each other. However, during assembly I noticed a defect and flipped one of them end for end so the other side would be out. The sideboards were 1/16th narrower on one end so this introduced 1/8" of wind. A foolish mistake, but one I could recover from.
Here is a picture from the bottom. I glued the sideboard to the top board on each edge and then used screws with washers to attach the top boards to the cleats. The washers make it easy for the top to slide back and forth in the elongated holes as the moisture content changes seasonally. This will always be my favorite photo of the bench because it really shows how smart the Nicholson bench design is. Siimple, straightforward, highly functional, it hides its sophistication.

Monday, December 12, 2011
Observation #3
A version of this bench could be built at low cost by a beginning woodworker with a very basic set of tools in a weekend or two. Mike Siemsen and Bob Rozaieski have really shown the way here. This is important because the initial learning curve is very steep and you really need a nice bench. Think about what it would have meant if you had had a bench like this when you were starting out. If you did, I think you were prescient. I wasn't.
Of course, you can easily make a more challenging version of the bench. If I had it to do over again, I think I would use the dovetail joinery for the stretchers and notches in the front aprons from the original. Just a nice historical connection.
Of course, you can easily make a more challenging version of the bench. If I had it to do over again, I think I would use the dovetail joinery for the stretchers and notches in the front aprons from the original. Just a nice historical connection.
Sunday, December 11, 2011
Observation #2
Make your bench out of good quality, relatively dry construction lumber, reclaimed lumber or a softer hardwood. If you can, make the top a full 2" thick. There is certainly nothing wrong with using construction lumber for the top but the 2" gives you assurance that your holdfasts will hold without blocks and has numerous other advantages. In our area, there are many suitable choices available for $3.50 per bf or less. I paid $3. There are 32 bf in the top, so that's $96. The total cost of all materials would still be less than $200 for the most important woodworking appliance you have. If you can't go this way, just use construction lumber and add bearers.
Finding suitable material was the hardest part of building this bench for me. Dry construction lumber just isn't available here in the midst of douglas fir forests. The best looking construction lumber I saw was #1 & btr 6x6s. They seem to be generally available in higher grades, likely to meet structural specifications. I thought very seriously about buying some and resawing them. I am lucky that I have a bandsaw that will do it, but you could use a circular saw, cutting on both sides and finishing with a handsaw. You'd have to wait awhile for it to dry before constructing the bench, over a summer here. Reclaimed lumber would be a great option and that was my first choice. Unfortunately, it is so popular here that it costs more than new lumber. I feel very fortunate that I found a small custom mill with a kiln and I decided to spend the extra money to use premium lumber, but it wasn't necessary. Had I not done this, I probably would have made the base out of construction lumber and purchased two softer hardwood planks for the top.
There is no reason not to build this bench entirely from 2x6s if that is what you find.
I used 120 bf . You could use less but, given the price of construction lumber, why not add mass and rigidity?
Bottom line: You just have to see what's available at a price you can afford, just as a 19th century craftsman would have done.
Finding suitable material was the hardest part of building this bench for me. Dry construction lumber just isn't available here in the midst of douglas fir forests. The best looking construction lumber I saw was #1 & btr 6x6s. They seem to be generally available in higher grades, likely to meet structural specifications. I thought very seriously about buying some and resawing them. I am lucky that I have a bandsaw that will do it, but you could use a circular saw, cutting on both sides and finishing with a handsaw. You'd have to wait awhile for it to dry before constructing the bench, over a summer here. Reclaimed lumber would be a great option and that was my first choice. Unfortunately, it is so popular here that it costs more than new lumber. I feel very fortunate that I found a small custom mill with a kiln and I decided to spend the extra money to use premium lumber, but it wasn't necessary. Had I not done this, I probably would have made the base out of construction lumber and purchased two softer hardwood planks for the top.
There is no reason not to build this bench entirely from 2x6s if that is what you find.
I used 120 bf . You could use less but, given the price of construction lumber, why not add mass and rigidity?
Bottom line: You just have to see what's available at a price you can afford, just as a 19th century craftsman would have done.
Saturday, December 10, 2011
Observations for Nicholson workbenches
I have kept the June 2007 issue of Popular Woodworking on my assembly table as I built my bench. The cover is the Nicholson bench Chris Schwarz built, but that isn't the reason. It contains his lengthy "10 Solid Rules for a Better Workbench" article, rules which he has repeated several times since in other publications. I think he would look at my bench and say I followed them all except for being clamp friendly and workbench height. I think this bench is clamp friendly; it's just that it emphasizes work holding by other means. As for height, he acknowledges that there is a range. I'm about 2" higher than his "pinky guideline", but, at over 6'2", 34" is as low as I will go.
In this spirit, I have decided to come up with 10 observations that I think may be useful to others considering building a Nicholson workbench. My hope is that you will chime in with comments, criticisms, observations of your own so that readers get a range of views.
So, here's Observation #1: You can design your Nicholson workbench to have as much mass and rigidity as you want. More is usually better, but not always. The most frequent criticism of Nicholson benches is that they lack both and I believe I have shown that it just isn't true. The amount of mass and rigidity your bench has is a design choice for you to make. Particularly if you use construction lumber, adding a 2x6 ledger for the bearers accomplishes several things. It solidly locks the legs vertical, like the shoulder of a huge tenon. With it, there is no need for a bottom stretcher along the length of the bench. It stiffens the side board, effectively turning the bottom half into a 4x6. It's easy, it's cheap, do it. The second best way is to add bearers. It is so easy to do this, I think the minimum number is seven. I'm leaving the top for a separate observation, so the third best way is to beef up the legs. Again, easy to laminate 2x6's. Especially if you are using construction lumber, material cost is not a big issue, so why not?
Mass and rigidity aren't always better. Mike Siemsen wants a bench that he can transport, so a bench over 300 lbs, like mine will be, wouldn't be good. You can always add bearers on either side of the leg so you have places on the bench that are super solid. Does the whole top need to be? Finally, you can build a solid bench raiser if you want.
My point is that this is a choice you get to make, not an inherent characteristic of the Nicholson bench.
In this spirit, I have decided to come up with 10 observations that I think may be useful to others considering building a Nicholson workbench. My hope is that you will chime in with comments, criticisms, observations of your own so that readers get a range of views.
So, here's Observation #1: You can design your Nicholson workbench to have as much mass and rigidity as you want. More is usually better, but not always. The most frequent criticism of Nicholson benches is that they lack both and I believe I have shown that it just isn't true. The amount of mass and rigidity your bench has is a design choice for you to make. Particularly if you use construction lumber, adding a 2x6 ledger for the bearers accomplishes several things. It solidly locks the legs vertical, like the shoulder of a huge tenon. With it, there is no need for a bottom stretcher along the length of the bench. It stiffens the side board, effectively turning the bottom half into a 4x6. It's easy, it's cheap, do it. The second best way is to add bearers. It is so easy to do this, I think the minimum number is seven. I'm leaving the top for a separate observation, so the third best way is to beef up the legs. Again, easy to laminate 2x6's. Especially if you are using construction lumber, material cost is not a big issue, so why not?
Mass and rigidity aren't always better. Mike Siemsen wants a bench that he can transport, so a bench over 300 lbs, like mine will be, wouldn't be good. You can always add bearers on either side of the leg so you have places on the bench that are super solid. Does the whole top need to be? Finally, you can build a solid bench raiser if you want.
My point is that this is a choice you get to make, not an inherent characteristic of the Nicholson bench.
Thursday, December 8, 2011
Stress reliever
Once I found wood I liked, my biggest concern about building this bench was whether I would be able to get the top flat without removing too much material. I have never flattened a surface this big and the prospect is somewhat daunting. I want holdfasts to work on the top without gluing in blocks, which proved to be a problem for Bob Rozaieski. Tools for Working Wood says the Gramercy holdfasts will work on surfaces 1 3/4" or thicker. My top boards are just under 2" as sanded by the mill, but not jointed.

So, today, I installed the bearers on each end and laid the boards on the base with my fingers crossed. The boards don't rock! What a relief. For some reason, the boards aren't quite the same thickness but, as best I can tell, I'll need to remove less than 1/16" of material. It looks like most of it will be front to back, which seems more straightforward than trying to take out twist. Reason for optimism anyway.
I confess that I also wanted to see what the bench is going to look like. Here it is:

I'm more than pleased, thrilled really. I have more work to do on the base, so the top boards are back on stickers. Assuming that I can in fact flatten the top successfully, this bench is going to more than meet my expectations going in.
After this, I went back to installing and planing bearers. I have been doing a fair amount of planing the past few days and was tiring. I thought I should stop and sharpen but, on a whim, I applied some paraffin to the base of the plane. I literally almost fell and, for a second, thought I was going to lose the plane off the other side of the base! My old wartime #7 has a corrugated base and I just don't understand how a little paraffin can make this much difference, but it does. I have tried this before without having much impact. Is it something about the fir? How is this possible?
Wednesday, December 7, 2011
Planar planing
Whether because of my progressive lenses or inexperience, I was having trouble satisfying myself with winding sticks that the tops of the side boards were in the same plane. So, as a doublecheck, I stretched string tightly across the diagonals and was relieved to find that they intersected in the middle without deflection. The last thing I want to do is remove a lot of material from the top, so I think this is a critical step. Not sure if you can see the string:

As you can see from the shavings, I did have to remove some material to get the side boards in the same plane.
I made the transverse bearers today, but didn't get them installed. I settled on seven:

I did some testing with a dead blow hammer and a block. It seems really solid.

As you can see from the shavings, I did have to remove some material to get the side boards in the same plane.
I made the transverse bearers today, but didn't get them installed. I settled on seven:

I did some testing with a dead blow hammer and a block. It seems really solid.
Tuesday, December 6, 2011
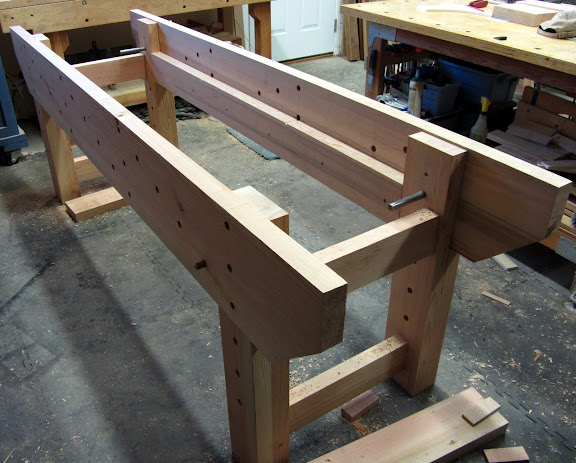
She's on her feet!
Things went quite smoothly. I glued the bottom two inches of the sideboards and installed screws from the back in elongated holes on the tops. The bottoms of the sideboards will be pegged to the legs.
After the glued dried, I spent time making sure the tops of the sideboards are as co-planar as I can possibly make them. The decision to leave them proud of the legs was a good one for this purpose.
Standing back to look at it, I have two reactions. I like it a lot, and eight feet is long for a bench. I can't even imagine a bench twelve feet long. Next step is to start installing transverse bearers.


After the glued dried, I spent time making sure the tops of the sideboards are as co-planar as I can possibly make them. The decision to leave them proud of the legs was a good one for this purpose.
Standing back to look at it, I have two reactions. I like it a lot, and eight feet is long for a bench. I can't even imagine a bench twelve feet long. Next step is to start installing transverse bearers.

Monday, December 5, 2011
Making progress
The leg assemblies and the sides are done, so it's time to start putting the pieces together. The top stretcher is low for a reason, as I'll explain later.


I mentioned that I made a bench raiser prototype. I made it from an old 4x4 and some scrap pieces of 2x4 in less than two hours. It turned out surprisingly well and I haven't felt the need to make another version. If I did, I wouldn't go crazy making dog holes though. The idea was to use my Lee Valley Wonder Pup set conveniently. Definite overkill, although they don't seem to hurt anything. My Moxon vise will be separate.

Bob Rozaieski's planing stop
Bob reviewed his first year experience with his Nicholson bench in a podcast. In it he talks about a planing stop he built for the center opening in the top that is really neat. It's just a board with notches on one side that fit over the transverse bearers and sits level with the top of the bench. When he turns it over, the board sits on top of the bearers and extends above the bench surface so it can be used as a planing stop. It's a simple but highly functional idea that I'll definitely be incorporating in my bench.
This podcast is interesting in its entirety, so check it out. In addition to confirming that I wanted a Nicholson bench, it convinced me that you can make most of the bench out of construction lumber but the top needs to be a full 2" thick. Christopher Schwarz came to the same conclusion. Yes, you could put in a lot of transverse bearers and get by, but you want your holdfasts to hold anywhere you place the holes for them.
This podcast is interesting in its entirety, so check it out. In addition to confirming that I wanted a Nicholson bench, it convinced me that you can make most of the bench out of construction lumber but the top needs to be a full 2" thick. Christopher Schwarz came to the same conclusion. Yes, you could put in a lot of transverse bearers and get by, but you want your holdfasts to hold anywhere you place the holes for them.
Thursday, December 1, 2011
A boring experience
I hadn't realized that my bench will have 72 holes for holdfasts or bench dogs. That's a lot of holes to bore with a brace and bit. However, the 60 in the sides and legs are done. My Goodell Pratt brace worked very smoothly and I was eventually boring quite quickly and accurately. I wanted to get all the holes in before starting assembly in order to make sure the transverse bearers don't conflict and I think it is easier to bore accurate holes vertically.
The sides and legs, except for installing the stretchers in the mortises, are done. I'm gluing the 2x6 ledgers to the sides before I attach the legs to the sides so I can butt the legs up very tight to them. These ledgers really beef up the sides, provide a stable base for the transverse bearers and help to stabilize the legs. Soon she'll be on her feet.

Postscript: After finishing, I decided I wanted to sharpen the bit before boring the holes in the top and I don't have an auger bit file. None of the suppliers I checked had them. Tools for Working Wood told me that the manufacturer has discontinued them. Lee Valley's site says, "This product is no longer available." I finally found one at Lie Nielsen. Hopefully, this is temporary but it doesn't augur well. :) You may want to get one while you can.
The sides and legs, except for installing the stretchers in the mortises, are done. I'm gluing the 2x6 ledgers to the sides before I attach the legs to the sides so I can butt the legs up very tight to them. These ledgers really beef up the sides, provide a stable base for the transverse bearers and help to stabilize the legs. Soon she'll be on her feet.

Postscript: After finishing, I decided I wanted to sharpen the bit before boring the holes in the top and I don't have an auger bit file. None of the suppliers I checked had them. Tools for Working Wood told me that the manufacturer has discontinued them. Lee Valley's site says, "This product is no longer available." I finally found one at Lie Nielsen. Hopefully, this is temporary but it doesn't augur well. :) You may want to get one while you can.
Wednesday, November 30, 2011
Fort Vancouver bench
Patrick Neal forwarded some detailed pictures of the bench at Fort Vancouver, which was apparently constructed to Nicholson's original specifications. Here they are:


Patrick says "[t]he bench is 32" high, the top is 30 x 104.5, the legs are true 4 x 4, the stretchers are also 4 x 4, and the skirt and top support boards are nearly a true 2 x 6. He says the vise needs a guide, demonstrating the wisdom of what Mike Siemsen has done (see below).


Patrick says "[t]he bench is 32" high, the top is 30 x 104.5, the legs are true 4 x 4, the stretchers are also 4 x 4, and the skirt and top support boards are nearly a true 2 x 6. He says the vise needs a guide, demonstrating the wisdom of what Mike Siemsen has done (see below).
Tuesday, November 29, 2011
Jamie Bacon's Bench
Here is a picture of Jamie Bacon's bench (used by
permission). Read about it on his
blog: Plane Shavings. Notice that he put notches on the legs into
the side board, as in the original engraving.
Jamie told me that he really
likes his front vise "but if I had it to do over, I’d have just made a
portable one like the Moxon that everybody’s gone nuts about this past
year." I really like the clean look
of not having a front stretcher or shelf, although Jamie has since added a
shelf to his.
Southern yellow pine is a nice wood for this bench. Wish we could get it here.

Subscribe to:
Posts (Atom)