Finishing up my latest project, a pie safe, I made a relatively small mistake and it reminded me of something. Earlier this year, an officer of our local woodworking guild was asked to define the difference between a beginner and an intermediate woodworker. He paused thoughtfully and then replied, "An intermediate woodworker can fix his or her mistakes without starting over with a fresh piece of wood." I found that answer interesting and provocative; in fact, I've thought quite a lot about it. I have put a lot of emphasis on making fewer and fewer mistakes, with some success and at the cost of slowing down my work considerably. Slowing down is not necessarily bad, but the fact remains that most of us will make some mistakes or encounter some unanticipated problem during the course of a project. Learning how to fix mistakes and problems is an essential skill and one I have enjoyed learning about this year.
I have read in various places that, if you disassemble a fine old piece, you will often find evidence of mistakes that were fixed by the craftsman in skilled and artful ways.

Friday, December 30, 2011
Wednesday, December 28, 2011
The Mechanic's Companion
It's interesting to browse through Nicholson's book, which is available on Google Books here One of the surprising things about it is the extensive section on geometry. It is quite sophisticated and technical. Even if a joiner didn't have a formal understanding of geometry, having the ability to make use of geometrical concepts could be extremely useful. If you scan the last part of the geometry section, you'll see what I mean. I am wondering how common it was in the early nineteenth century for woodworkers to have this skill. Anybody know?
Thursday, December 22, 2011
Who was Peter Nicholson?
Reading about the design of what we call the Nicholson work bench made me curious. The best biography I could find of Peter Nicholson is on Wikipedia here. Turns out he was an extremely interesting man, self-taught and accomplished in architecture, mathematics and engineering. As a youth, he served an apprenticeship to a cabinet-maker and worked as a journeyman before abandoning the trade in favor of teaching and writing. The list of his publications is lengthy. A common theme is the application of science and mathematics to practical problems of construction and design.
In my opinion, the Nicholson workbench is a timeless classic, simple and elegant but based on a sophisticated understanding of effective and efficient design. Almost every element serves multiple purposes. It has a high strength to weight ratio and can be made very long. It was put forward by a man uniquely qualified to appreciate its excellence. One of the things I like about my bench is that it springs from this history. It is timeless.
Monday, December 19, 2011
Nicholson saw bench?
I mentioned in a previous post that I wanted to have a pair of saw benches. I find that it would be nice to have a second saw bench when I am sawing longer stock and I would also like them to do double duty as the base for a temporary low assembly table. Today I did an internet search for saw benches and came upon the following at Kari Hultman's The Village Carpenter blog (used with permission):

"I searched the internet this morning for saw bench plans and settled on one built by Dan Klauder, who found inspiration in Alex Bealer's Old Ways of Working Wood."
So, to Alex Bealer, Dan Klauder and Kari Hultman, thank you. Check out the book and the blogs.
Sunday, December 18, 2011
A new holiday tradition
Our son is home for the holiday from law school. He's a cool cat (I'm dating myself) so I was pleasantly surprised when he agreed to my proposal that we cut five minute dovetails together each morning. For those of you who don't remember, Gary Rogolski, from Oregon, wrote an article in Fine Woodworking some years ago suggesting cutting a dovetail as a warm-up or training exercise on a daily basis. Here's a video. You make a single joint with a single tail quickly and without fussing, primarily by eye.
It's a great idea and has been a lot of fun for both of us. There is no pressure because the joint is going in the burn bin regardless of the outcome. We take our morning coffee out to the shop and, twenty minutes later, both of us are done (We take turns with the tools). Working this way, rather than the painstakingly slow approach I take with dovetails on an actual project, is very instructive. As a plus, it's a very nice shared experience that means a lot to me.
Try it for a week, if you can with a son, daughter, father or mother.
Happy holidays.
Thursday, December 15, 2011
Becoming a hand tool woodworker
I can remember, almost to the day, when I became a hand tool woodworker, novice division. It was two years ago now that I watched the first episode of Bob Rozaieski's podcast series on building a Porringer tea table. Designed for beginners, it taught in a step by step, clear way how to make cabriole legs with hand tools. I remember thinking, "I don't know if I could ever do something like that, but I want to try." I had some 12/4 alder, so the risk was small. It went so well that I made another, then a third from claro walnut.
As I went along, I began accumulating and using hand tools, some new, some restored and made a tool chest to house them. Increasingly, my power-tool-centered workshop didn't work. It was cramped, the layout was wrong and the benches were wrong, just not designed for hand tool work. This fall, I went on a tear, selling my tablesaw, my bench and an assembly table as well as numerous tools I wasn't using. I made the Nicholson bench and repurposed an antique butcher block that belonged to my wife's parents as a joinery bench. Next up is a second saw bench that, along with its mate and a piece of plywood, can double as a low assembly table. This is where things stand:

I cannot tell you what a difference this represents. Of course, you can't see the power tools around the periphery, but that's the point. They are on the periphery. The transformation may never be complete but a tipping point has been passed.
Finish for workbenches
There are a number of opinions regarding the appropriate finish to put on workbenches. The main alternatives recommended seem to be:
- No finish
- Watco Danish Oil
- boiled linseed oil
- wax
- A mixture of turpentine, beeswax and boiled linseed oil
- Waterlox
- a mixture of spar varnish, mineral spirits and boiled linseed oil.
I chose 7, in part because I had the ingredients on hand and in part because I thought it would provide the best protection for the bench. This is what Lie Nielsen uses on their benches. My main concern was that it would make the surface slippery and interfere with workholding. I avoided polyurethane varnish for that reason. I applied one thick coat and am happy to report that it worked well. With my eyes closed, I cannot tell the difference between a bare surface and a surface that this mixture has been applied to. It is not slippery. I will not be waxing it.
As you can tell from the picture below, the finish produced an amber tint on the douglas fir and really brought out the color differences that were present in the wood. The picture was taken right after the finish was applied and the sheen has since disappeared.
I'm happy with the choice so far. We'll see how it holds up.
Tuesday, December 13, 2011

Observation #4
It is very important to make sure the tops of the sideboards are coplanar as soon as they are attached to the leg assemblies and prior to the installation of the bearers. Maybe this is obvious, but I was very fortunate to pay close attention to it, as detailed previously. I introduced about 1/8" of wind during assembly. I was . . . displeased. The great thing about the Nicholson design and handtools is you can fix it. I used my jointer to carefully bring them back into planarity. Then, when I installed the bearers, I planed them flat to the sideboards. The payoff for me was this: When I installed the top boards, they were dead flat. To my amazement, I am done, ready for finish. No flattening of the top boards is required!

What was my mistake? I planed the sideboards perfectly even with each other. However, during assembly I noticed a defect and flipped one of them end for end so the other side would be out. The sideboards were 1/16th narrower on one end so this introduced 1/8" of wind. A foolish mistake, but one I could recover from.
Here is a picture from the bottom. I glued the sideboard to the top board on each edge and then used screws with washers to attach the top boards to the cleats. The washers make it easy for the top to slide back and forth in the elongated holes as the moisture content changes seasonally. This will always be my favorite photo of the bench because it really shows how smart the Nicholson bench design is. Siimple, straightforward, highly functional, it hides its sophistication.

Monday, December 12, 2011
Observation #3
A version of this bench could be built at low cost by a beginning woodworker with a very basic set of tools in a weekend or two. Mike Siemsen and Bob Rozaieski have really shown the way here. This is important because the initial learning curve is very steep and you really need a nice bench. Think about what it would have meant if you had had a bench like this when you were starting out. If you did, I think you were prescient. I wasn't.
Of course, you can easily make a more challenging version of the bench. If I had it to do over again, I think I would use the dovetail joinery for the stretchers and notches in the front aprons from the original. Just a nice historical connection.
Of course, you can easily make a more challenging version of the bench. If I had it to do over again, I think I would use the dovetail joinery for the stretchers and notches in the front aprons from the original. Just a nice historical connection.
Sunday, December 11, 2011
Observation #2
Make your bench out of good quality, relatively dry construction lumber, reclaimed lumber or a softer hardwood. If you can, make the top a full 2" thick. There is certainly nothing wrong with using construction lumber for the top but the 2" gives you assurance that your holdfasts will hold without blocks and has numerous other advantages. In our area, there are many suitable choices available for $3.50 per bf or less. I paid $3. There are 32 bf in the top, so that's $96. The total cost of all materials would still be less than $200 for the most important woodworking appliance you have. If you can't go this way, just use construction lumber and add bearers.
Finding suitable material was the hardest part of building this bench for me. Dry construction lumber just isn't available here in the midst of douglas fir forests. The best looking construction lumber I saw was #1 & btr 6x6s. They seem to be generally available in higher grades, likely to meet structural specifications. I thought very seriously about buying some and resawing them. I am lucky that I have a bandsaw that will do it, but you could use a circular saw, cutting on both sides and finishing with a handsaw. You'd have to wait awhile for it to dry before constructing the bench, over a summer here. Reclaimed lumber would be a great option and that was my first choice. Unfortunately, it is so popular here that it costs more than new lumber. I feel very fortunate that I found a small custom mill with a kiln and I decided to spend the extra money to use premium lumber, but it wasn't necessary. Had I not done this, I probably would have made the base out of construction lumber and purchased two softer hardwood planks for the top.
There is no reason not to build this bench entirely from 2x6s if that is what you find.
I used 120 bf . You could use less but, given the price of construction lumber, why not add mass and rigidity?
Bottom line: You just have to see what's available at a price you can afford, just as a 19th century craftsman would have done.
Saturday, December 10, 2011
Observations for Nicholson workbenches
I have kept the June 2007 issue of Popular Woodworking on my assembly table as I built my bench. The cover is the Nicholson bench Chris Schwarz built, but that isn't the reason. It contains his lengthy "10 Solid Rules for a Better Workbench" article, rules which he has repeated several times since in other publications. I think he would look at my bench and say I followed them all except for being clamp friendly and workbench height. I think this bench is clamp friendly; it's just that it emphasizes work holding by other means. As for height, he acknowledges that there is a range. I'm about 2" higher than his "pinky guideline", but, at over 6'2", 34" is as low as I will go.
In this spirit, I have decided to come up with 10 observations that I think may be useful to others considering building a Nicholson workbench. My hope is that you will chime in with comments, criticisms, observations of your own so that readers get a range of views.
So, here's Observation #1: You can design your Nicholson workbench to have as much mass and rigidity as you want. More is usually better, but not always. The most frequent criticism of Nicholson benches is that they lack both and I believe I have shown that it just isn't true. The amount of mass and rigidity your bench has is a design choice for you to make. Particularly if you use construction lumber, adding a 2x6 ledger for the bearers accomplishes several things. It solidly locks the legs vertical, like the shoulder of a huge tenon. With it, there is no need for a bottom stretcher along the length of the bench. It stiffens the side board, effectively turning the bottom half into a 4x6. It's easy, it's cheap, do it. The second best way is to add bearers. It is so easy to do this, I think the minimum number is seven. I'm leaving the top for a separate observation, so the third best way is to beef up the legs. Again, easy to laminate 2x6's. Especially if you are using construction lumber, material cost is not a big issue, so why not?
Mass and rigidity aren't always better. Mike Siemsen wants a bench that he can transport, so a bench over 300 lbs, like mine will be, wouldn't be good. You can always add bearers on either side of the leg so you have places on the bench that are super solid. Does the whole top need to be? Finally, you can build a solid bench raiser if you want.
My point is that this is a choice you get to make, not an inherent characteristic of the Nicholson bench.
Thursday, December 8, 2011
Stress reliever
Once I found wood I liked, my biggest concern about building this bench was whether I would be able to get the top flat without removing too much material. I have never flattened a surface this big and the prospect is somewhat daunting. I want holdfasts to work on the top without gluing in blocks, which proved to be a problem for Bob Rozaieski. Tools for Working Wood says the Gramercy holdfasts will work on surfaces 1 3/4" or thicker. My top boards are just under 2" as sanded by the mill, but not jointed.

So, today, I installed the bearers on each end and laid the boards on the base with my fingers crossed. The boards don't rock! What a relief. For some reason, the boards aren't quite the same thickness but, as best I can tell, I'll need to remove less than 1/16" of material. It looks like most of it will be front to back, which seems more straightforward than trying to take out twist. Reason for optimism anyway.
I confess that I also wanted to see what the bench is going to look like. Here it is:

I'm more than pleased, thrilled really. I have more work to do on the base, so the top boards are back on stickers. Assuming that I can in fact flatten the top successfully, this bench is going to more than meet my expectations going in.
After this, I went back to installing and planing bearers. I have been doing a fair amount of planing the past few days and was tiring. I thought I should stop and sharpen but, on a whim, I applied some paraffin to the base of the plane. I literally almost fell and, for a second, thought I was going to lose the plane off the other side of the base! My old wartime #7 has a corrugated base and I just don't understand how a little paraffin can make this much difference, but it does. I have tried this before without having much impact. Is it something about the fir? How is this possible?
Wednesday, December 7, 2011
Planar planing
Whether because of my progressive lenses or inexperience, I was having trouble satisfying myself with winding sticks that the tops of the side boards were in the same plane. So, as a doublecheck, I stretched string tightly across the diagonals and was relieved to find that they intersected in the middle without deflection. The last thing I want to do is remove a lot of material from the top, so I think this is a critical step. Not sure if you can see the string:

As you can see from the shavings, I did have to remove some material to get the side boards in the same plane.
I made the transverse bearers today, but didn't get them installed. I settled on seven:

I did some testing with a dead blow hammer and a block. It seems really solid.

As you can see from the shavings, I did have to remove some material to get the side boards in the same plane.
I made the transverse bearers today, but didn't get them installed. I settled on seven:

I did some testing with a dead blow hammer and a block. It seems really solid.
Tuesday, December 6, 2011
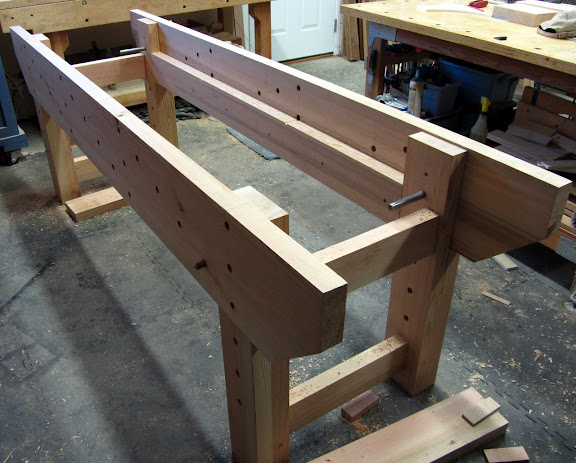
She's on her feet!
Things went quite smoothly. I glued the bottom two inches of the sideboards and installed screws from the back in elongated holes on the tops. The bottoms of the sideboards will be pegged to the legs.
After the glued dried, I spent time making sure the tops of the sideboards are as co-planar as I can possibly make them. The decision to leave them proud of the legs was a good one for this purpose.
Standing back to look at it, I have two reactions. I like it a lot, and eight feet is long for a bench. I can't even imagine a bench twelve feet long. Next step is to start installing transverse bearers.

Monday, December 5, 2011
Making progress
The leg assemblies and the sides are done, so it's time to start putting the pieces together. The top stretcher is low for a reason, as I'll explain later.


I mentioned that I made a bench raiser prototype. I made it from an old 4x4 and some scrap pieces of 2x4 in less than two hours. It turned out surprisingly well and I haven't felt the need to make another version. If I did, I wouldn't go crazy making dog holes though. The idea was to use my Lee Valley Wonder Pup set conveniently. Definite overkill, although they don't seem to hurt anything. My Moxon vise will be separate.

Bob Rozaieski's planing stop
Bob reviewed his first year experience with his Nicholson bench in a podcast. In it he talks about a planing stop he built for the center opening in the top that is really neat. It's just a board with notches on one side that fit over the transverse bearers and sits level with the top of the bench. When he turns it over, the board sits on top of the bearers and extends above the bench surface so it can be used as a planing stop. It's a simple but highly functional idea that I'll definitely be incorporating in my bench.
This podcast is interesting in its entirety, so check it out. In addition to confirming that I wanted a Nicholson bench, it convinced me that you can make most of the bench out of construction lumber but the top needs to be a full 2" thick. Christopher Schwarz came to the same conclusion. Yes, you could put in a lot of transverse bearers and get by, but you want your holdfasts to hold anywhere you place the holes for them.
This podcast is interesting in its entirety, so check it out. In addition to confirming that I wanted a Nicholson bench, it convinced me that you can make most of the bench out of construction lumber but the top needs to be a full 2" thick. Christopher Schwarz came to the same conclusion. Yes, you could put in a lot of transverse bearers and get by, but you want your holdfasts to hold anywhere you place the holes for them.
Saturday, December 3, 2011
The Moxon vise
Nicholson's book followed by a century a famous and influential work by Joeseph Moxon, entitled Mechanick Exercises: Or The Doctrine of Handy-Works (available on Google Books). One passage is particularly noteworthy regarding the illustration of a workbench:
Christopher Schwarz reintroduced us to the latter alternative, the Moxon twin screw vise as it is now known. Here is a link to a post on his blog at Popular Woodworking and here is one to the Sketchup model. This vise has become very popular and appears to be on its way to widespread adoption. I made a crude prototype and quickly decided I would never be without one. It is because I like this vise so much that I am not putting a vise on my bench.
Making your twin screw vise portable has numerous advantages. The experts want you to make your bench low, primarily for planing. Like many, I resisted this advice and finally settled on 34," too high by their standards and too low by mine. This really came home to me when I saw a picture of Christopher Schwarz, a tall fellow, dovetailing at his bench. He looked like a giraffe talking to a child in a cartoon. He was bent way forward at the waist and way back at the neck. It is no wonder that he embraced the Moxon vise. Having the vise sit on top of the bench means the work is raised up considerably to a much more comfortable position, yet still held securely.
Another advantage is its portability. I needed to do something for a friend recently at his house. I took my prototype Moxon vise and my sawbench with me and used the vise on top of the sawbench. It worked great. I have seen pictures of it being used on a picnic table.
The rub is figuring out how to make or buy the screws. There is a manual threader available but it is generally known to be of highly uneven quality. Beall makes a threader kit that is somewhat more expensive and uses a router. Both of these options require high quality dowels, which are hard to come by in large sizes (1 1/4 or 1 1/2"), though Beall does sell dowels on its website, or you can make your own. An interesting alternative recently came to my attention. The December 2011 edition of ShopNotes has a project for a different kind of benchtop vise. They do a nice job of making a screw from acme threaded rod and a shopmade wooden hub, which doesn't require a lathe for construction and is very rugged. You could make two of these for a twin screw vise.
Finally, a variant of the twin screw vise is to make it as part of a small "bench on bench" for joinery, an idea that is also gaining popularity. I made a crude prototype of this too and really like it.
The Moxon vise lets me lower my bench height and feel comfortable not having a vise on my bench. I am reassured by Bob Rozaieski comments below that my direction is viable.
Update: See the comments for several approaches using steel screws. McMaster-Carr is a good source for acme threaded rod. For example, 1"-5 tpi rod 12" long can be had for as little as $11.50 apiece. See this page. If you prefer wooden threads, many major suppliers carry the manual threader kit. This is the link for the router-based threading kit, which is also carried by Lee Valley.
Here is a link to Derek Cohen's version, with an I beam for dovetailing that he devised.
Sometimes a double Screw is fixed to the side of the Bench, as at g; or sometimes its farther cheek is laid an edge upon the flat of the Bench, and fastened with an Hold-fast, or, sometimes, two on the Bench.
Christopher Schwarz reintroduced us to the latter alternative, the Moxon twin screw vise as it is now known. Here is a link to a post on his blog at Popular Woodworking and here is one to the Sketchup model. This vise has become very popular and appears to be on its way to widespread adoption. I made a crude prototype and quickly decided I would never be without one. It is because I like this vise so much that I am not putting a vise on my bench.
Making your twin screw vise portable has numerous advantages. The experts want you to make your bench low, primarily for planing. Like many, I resisted this advice and finally settled on 34," too high by their standards and too low by mine. This really came home to me when I saw a picture of Christopher Schwarz, a tall fellow, dovetailing at his bench. He looked like a giraffe talking to a child in a cartoon. He was bent way forward at the waist and way back at the neck. It is no wonder that he embraced the Moxon vise. Having the vise sit on top of the bench means the work is raised up considerably to a much more comfortable position, yet still held securely.
Another advantage is its portability. I needed to do something for a friend recently at his house. I took my prototype Moxon vise and my sawbench with me and used the vise on top of the sawbench. It worked great. I have seen pictures of it being used on a picnic table.
The rub is figuring out how to make or buy the screws. There is a manual threader available but it is generally known to be of highly uneven quality. Beall makes a threader kit that is somewhat more expensive and uses a router. Both of these options require high quality dowels, which are hard to come by in large sizes (1 1/4 or 1 1/2"), though Beall does sell dowels on its website, or you can make your own. An interesting alternative recently came to my attention. The December 2011 edition of ShopNotes has a project for a different kind of benchtop vise. They do a nice job of making a screw from acme threaded rod and a shopmade wooden hub, which doesn't require a lathe for construction and is very rugged. You could make two of these for a twin screw vise.
Finally, a variant of the twin screw vise is to make it as part of a small "bench on bench" for joinery, an idea that is also gaining popularity. I made a crude prototype of this too and really like it.
The Moxon vise lets me lower my bench height and feel comfortable not having a vise on my bench. I am reassured by Bob Rozaieski comments below that my direction is viable.
Update: See the comments for several approaches using steel screws. McMaster-Carr is a good source for acme threaded rod. For example, 1"-5 tpi rod 12" long can be had for as little as $11.50 apiece. See this page. If you prefer wooden threads, many major suppliers carry the manual threader kit. This is the link for the router-based threading kit, which is also carried by Lee Valley.
Here is a link to Derek Cohen's version, with an I beam for dovetailing that he devised.
Thursday, December 1, 2011
A boring experience
I hadn't realized that my bench will have 72 holes for holdfasts or bench dogs. That's a lot of holes to bore with a brace and bit. However, the 60 in the sides and legs are done. My Goodell Pratt brace worked very smoothly and I was eventually boring quite quickly and accurately. I wanted to get all the holes in before starting assembly in order to make sure the transverse bearers don't conflict and I think it is easier to bore accurate holes vertically.
The sides and legs, except for installing the stretchers in the mortises, are done. I'm gluing the 2x6 ledgers to the sides before I attach the legs to the sides so I can butt the legs up very tight to them. These ledgers really beef up the sides, provide a stable base for the transverse bearers and help to stabilize the legs. Soon she'll be on her feet.

Postscript: After finishing, I decided I wanted to sharpen the bit before boring the holes in the top and I don't have an auger bit file. None of the suppliers I checked had them. Tools for Working Wood told me that the manufacturer has discontinued them. Lee Valley's site says, "This product is no longer available." I finally found one at Lie Nielsen. Hopefully, this is temporary but it doesn't augur well. :) You may want to get one while you can.
Subscribe to:
Comments (Atom)