Showing posts with label Tool chests. Show all posts

Monday, December 7, 2015

Put a lid on it

Having moved the saws from the lid of my tool chest to the tote last week, I began thinking about what to do about the lid, intending to make a new one.  This was the same question that perplexed me when I first made the chest several years ago.  I looked yet again at all the pictures of historical and modern tool chests I could find without seeing anything that appealed to me.  On a whim I tried knocking off the pieces for holding the saws I had attached to the existing lid and they came off with only cosmetic damage.  Being lazy and cheap by nature, I decided to just put a new 1/4" baltic birch plywood skin on the underside of the existing lid rather than make a new one.  That left 1 1/2" of clearance under the lid where the saws had been to do ... what with?

I have a very strong opinion that a practical use should be made of the inside of the lid on a tool chest.  You could argue that putting too much weight on the hinges is an issue, perhaps why saws were often put there historically, but my chest has a Lee Valley stainless steel piano hinge with screws on 2" centers attached to hard maple.  The bigger issue to me is holding everything you put on the lid in place both horizontally when the lid is closed and vertically when it is open.  Large thin tools that are easy to secure are the best candidates, another reason why saws were the historical choice.  When I thought about it this way, some good candidates sprang to mind:  winding sticks, a straightedge and a square that I have made:

 
This is a good place to store them and, as a bonus, these tools are nice to look at.  I'm now thinking of some additional ones I can make, like Chris Schwarz's english layout square, for example.  Eventually, I envision this space being filled with tools I have made.

In response to my last post, Ralph commented that my top till looked somewhat jumbled, just the impetus I needed to address something I have noticed too.  I made some dividers out of 3/8" maple:


Finally, something I hadn't realized and didn't read anywhere when I was building my chest is that you want to grasp the handles on the tills "upside down."  This had an easy solution, which looks nice to my eye.  I just added some maple finger pulls to the tops of the purpleheart handles:


I think this tune-up is going to do it for another several years.  The tool chest of about this size is a classic form and coming up with my own version of it has been very enjoyable.

Tuesday, December 1, 2015

Saw tote

In a recent post, I wrote that I intended to take my saws off the lid of my tool chest and put them in the removable tote that stores in front of the tills.  I had two reasons for this, first, that I find them inconvenient to use from the lid and, second, that I have more saws than will fit on the lid and I want to keep my saws together.

Before I describe my saws, let me anticipate your reaction by acknowledging that I don't need ten saws; I want ten saws.  My rule is that if I have used a tool from my chest at least a few times in the past year, it stays and, if not, it is relegated to secondary storage.  Ten saws pass this test.  It's true that I could get along without ten saws and, if I need space for a higher priority tool, I'll cut back.  In the meantime, I want space for all ten.

The ten saws are pairs of handsaws, panel saws and backsaws (rip and crosscut), a dovetail saw, a flush cut saw, a coping saw and a dozuki.


 If I were to get rid of any saws, they would be the handsaws and the dozuki.  I bought a nice pair of panel saws at a garage sale only because they were $5 apiece and, to my surprise, I have become very attached to them.  I use them much more than I use the handsaws.

I was really scratching my head trying to squeeze all ten saws into the tote, but I managed, except for the flush cut saw, which is small anyway:

 
Four of these saws were stored in the tills previously, so this really frees up a lot of space in them.  The chisels were already there and the panel saws fit, so I left them.

I think I am going to be very happy with this arrangement.  The one concern I have is dinging up the handles, but my best saws are in the middle and, if I pay attention, I think I can avoid it.

Here is what the till looks like in the chest:


Tuesday, November 17, 2015

Tool chest update

I have been using my tool chest for several years now and I thought there might be an interest in an update.  Overall, my experience has been outstanding and I am very happy with it.  As I began preparing for this post, though, I started thinking about a criticism I often read, that you have to bend over to get out your tools.  I want first of all to emphasize that I have never found this to be a problem, not even a little, even though I am 65 and not terribly flexible.  But, what if you think this is a problem, what could you do?  I decided to try something I haven't seen anywhere, basically putting the chest up on a base.  Primarily using material on hand for this experiment, here is what I came up with:


The chest is 2'x2'x3' and I built a base 2' high, so the top of the open lid is 6' high, 2" shorter than I am.  This seems like the maximum practical height.  In limited use so far it is comfortable and convenient, enough so that I decided to add a shelf and try it for a while:


This shelf is where I am storing my bench accessories, like a bench raiser, Moxon vise, shooting boards, etc.  This is a really good place for these things, readily accessible but out of the way.

Is this base a good idea?  Don't know yet, but seems like it might be.  So why have a chest if you are going to do this, why not have wall cabinets?  I am not going to get into the debate over wall cabinets vs. chests, among other reasons because I think each has advantages and your choice should depend on your preferences, workspace, tools, etc.  My point here is that this is an option, particularly if you think bending over to get into a chest is a problem.  As I said, bending over was never a problem for me but I do think an advantage of the base is that it allows you to make better use of shop space near your bench.

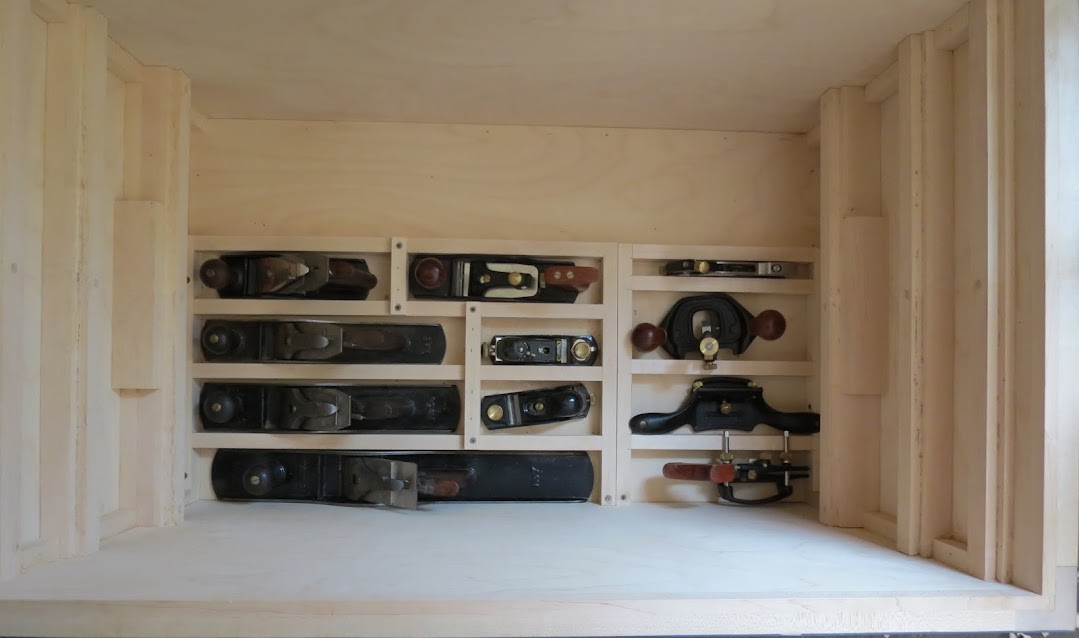
Now, on to the update.  With a major exception, I think I was very lucky with the layout of my chest.  I store my planes in the bottom and I really like this arrangement.  They are very easy to grab and are well protected (I need to finish out dividers in the back).  When I moved, I put an old comforter over the top of them and left them in place; they arrived without a scratch (In fact, I left all my tools in the chest without incident).


In the bottom till, I store my panel saws, drills, brace and bits and a tool roll.


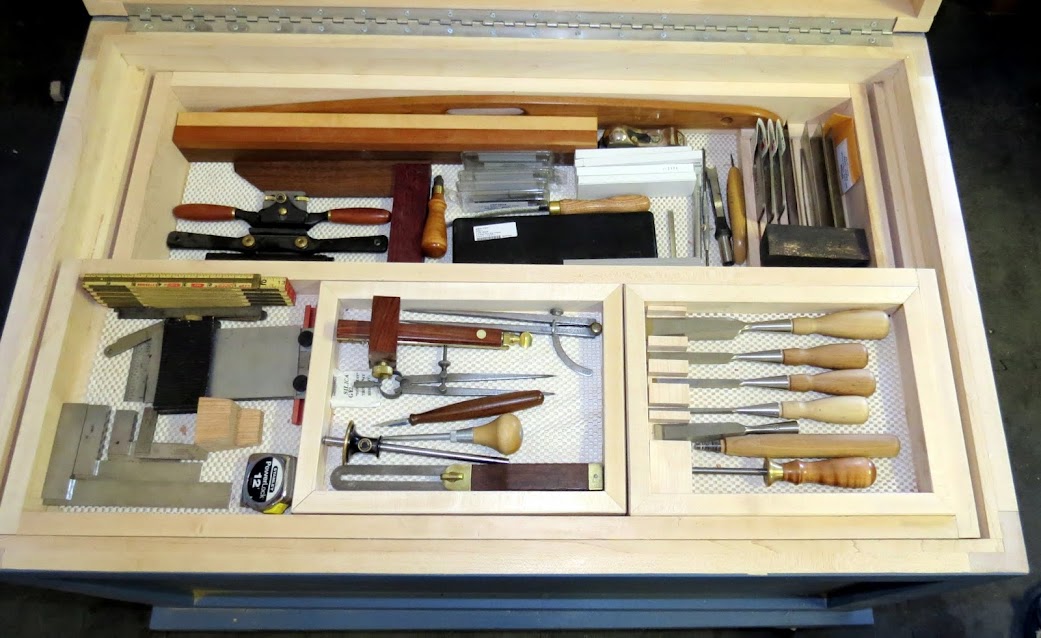
In the next till, I have my coping saws, dowel former, scrapers and extra plane blades.  In the top till I have measuring and marking tools as well as chisels.  The paintbrushes are there because I brush off my planes before I put them away:


On the underside of the lid, I have most of my saws:


Finally, I made a tote that fits into the space in front of the tills that is miscellaneous storage right now.  One of the reasons I made it was to secure the tills when the chest is being transported and it does that very well.  When the chest is in use, the tote sits on a nearby shelf:


After several years, I am really sold on tool chests and I am mostly happy with the way I constructed mine.  It is so convenient to have your tools a step away from the bench in one extremely compact space that can be secured and protected.  I don't have a lot of nearby wall space so this is a much better option for me than wall cabinets.  I also like the fact that my tools are protected from our damp winter climate, since my shop is in the garage.  The thing I don't like about it is the saws on the lid, which I find awkward and not a good use of space.  A second thing that seems less than ideal to me is the way the small tools in the top till are jumbled.  I have decided to make a change.

My current thinking is to make a new top for the chest and fit in custom racks for many of the small tools that are in the top till now as well as other small tools that are stored elsewhere.  I would have a removable inside cover to hold the tools in place when the chest is closed.  The weight will not be a problem because of the very heavy duty Lee Valley piano hinge I used for the top.  If I leave the chest up on the base, the top will, in effect, function like a wall cabinet.  I would move all of my saws into the tote, which I think will be much more convenient to take out and use.  That will also free up space in the tills.  What do you think?

I know that some of you will scowl at my use of baltic birch plywood for the chest and I sometimes feel the same way.  However, it really is an excellent material for a tool chest and the maple "exoskeleton" hides the edges as well as providing structural strength. 


Thursday, June 6, 2013

Finishing

Here is the project after application of stain and Waterlox, which I chose for ease of application and repairability:


The grain on the third drawer from the bottom irks me.  I was using scraps and chose not to buy more material for a shop piece but now I wish I had.

To make finishing easier, I haven't installed the shiplapped back yet:


One of the interesting parts of making a traditional piece is to focus on the design.  Why is it the way it is?  Most of the mechanic's tool chests I am aware of have the drawers inset from the front of the carcase about an inch.  This is done to leave room for knobs and a removable frame and panel front that keeps the drawers from opening and provides a measure of security, since they usually lock in some way.  I didn't like this on my old chest because the knobs were so small they were difficult to grasp.  If the front panel is 1/2" deep, that only leaves 1/2" for the knobs, too small for my big fingers.  It does seem like a good idea to have the knobs protected by the carcase so they don't get broken off when you are transporting the chest and you definitely need a way of keeping the drawers from opening.  As for security, I am not concerned because I think somebody would just take the whole chest anyway and don't see the point of locking the drawers.  I wanted to come up with an alternative that would let my knobs be 1" deep and still provide a way to restrain the drawers.  I had an idea, but it seemed so cockamamie that I put off the decision until the last possible moment.  Here it is:


I drilled a through hole in the top and a 1/2" deep hole in the bottom of the carcase and put knobs on the end of two dowels as a way of restraining the drawers without taking up any extra depth.  I am pleasantly surprised because it seems like this will work well, although I admit it looks a tad strange.  No accounting for taste, but I kind of like the way it looks, unpretentious and functional.  I may do something different with the knobs if I get a better idea.  One of the concerns I had is whether the dowels would pop out of the holes in the bottom if the case is jarred, but I have several solutions if one proves necessary.  One is to put a rare earth magnet in the bottoms of the holes and washers on the ends of the dowels.  So far it doesn't seem to be an issue.

I have put off buying hardware due to indecision.  I picked out the hardware I really wanted from Lee  Valley, but it came to $111 for eight brass corners, 12 brass knobs and a leather handle!  It is the eight brass corners that are so expensive and I wonder if you really need them on a piece that will be transported very infrequently.  I am going to look for some more economical alternatives first, but this is certainly beautiful hardware and would really make the chest a showpiece.

Thursday, May 23, 2013

Drawer progress

The dry fitted drawers, sans bottoms, slide easily on the runners and I think the single half-blind dovetail joint was a good choice as it leaves room for the dado and provides a strong mechanical joint on such a shallow drawer.

I previously posted links to two videos about making half-blind dovetails that contain a number of tips I hadn't seen before and I decided to try one of them.  I cut the pins first and then marked out the drawer front to receive them.  After I made the diagonal saw cuts in the usual manner, I used my drill press to drill a row of holes just shy of the baseline and just a little shallower than the length of the tail.  I split out the waste from the end of the drawer front, then removed the final sliver by registering the chisel in the marking gauge line.  The final step is to pare down to the marking gauge line to the baseline from the row of holes.  I hope my description is clear as I forgot to take pictures, but you can look at the video if you are interested.  It is similar to creating a tenon by sawing the shoulder and  then splitting it out from the end.  This method is very fast and seemingly foolproof, though I realize it is "cheating."  You could do essentially the same thing with a hand drill though.  I was really surprised by how quickly this went and how accurate it is.  I am very slow at chopping out dovetail waste with a chisel and this tip really speeded things up.

Here's the result:


There is absolutely no place to hide with drawer construction like this.  I'd like to tell you the drawers came out this way on the first try but the truth is it took some adjusting with a plane to get the spacing looking this good.  I do regret the mismatched grain in the one drawer front, but these were scraps and I didn't have any more like the others.  It would have looked better on the bottom I think, but the scrap wasn't wide enough for that (there are three drawer widths).

I read recently that Garret Hack is teaching a week-long course on making drawers and this project makes me realize how much I'd like to take it.  As it is, I am more or less making this up as I go along as I haven't made drawers like this before.  I've read about achieving a "piston fit" and I decided to go for it with some trepidation.  The tolerances are very tight and it wouldn't take much to create a real problem.  As a result, I became very concerned about the glue-up and decided to take it slowly, one step at a time.  The drawers have to be precisely square and I decided that gluing in a solid bottom in slips and assembling the complete drawer in one step was more than I wanted to attempt the first time around, so I am trying something unusual.  I decided to just glue up the front and sides first and then install the bottom and back in a second step.  This may well be crazy.  Here's what step one looks like:


I hope my wife doesn't find out I am using her granite counter as a flat and warm place for these to dry.  Since the back will be pinned in the rabbet, my idea is to glue in the slips, slide in the bottom and install the back as a second step.  We'll see.  Perhaps I'll get a lesson in reversing hide glue.  :(

Thursday, May 16, 2013

Drawers

The carcase is done, except for the back, which will go on after finishing:


I have amused myself thinking about how I want to make the drawers for my tool chest.  Books have been written on the subject and I have little to add save my own preferences and some practical considerations.

As I've written, somehow the traditional half-blind  dovetails on the drawers for a tool chest don't feel right to me, sort of like wearing a tuxedo into the shop.  I am not arguing that this makes sense, only that it's my feeling.

A comment suggests through dovetails which would obviously show through the front of the drawer and this appeals to me.   There is a complication in that the dovetails would have to be laid out very carefully or the dados for the runners in the sides would have to be stopped.  I decided to pass.

I could of course make the drawers in the modern fashion--a box with butt joints and a false front.  Based on experience with the custom cabinets in our house, they hold up better than you might expect and I could pin them for strength.  Don't like them.

I went on in this vein for some time and finally came back to where I started with a twist.  What if I used half-blind dovetails with a single tail and pinned the tails in addition?  For whatever reason, this just seems more like what I want to see on a tool chest.  The extreme case is the 3" drawers which, with 1/2" pins will have a tail 2" wide, so I decided to see what they would look like:


These look right to me and I think a couple of 1/8" pins in the tail will look fine, so this is what I am going with.  I think they will have sufficient strength for shallow drawers like this.  A 1/4" dado will run down the middle of the tail.  You may also notice that I am using oak rather than a secondary wood.  I have a lot of alder but I am not sure how it would wear on the runners.  I also intend to take these drawers out a lot and put them on my bench, so they will look nice completed in oak.  There just isn't the cost saving there would be on a large piece.

I happened to stumble across some 24"x30" baltic birch plywood panels on sale so that is what I am going to use for the bottoms, glued solid in slips (Surprisingly, the plywood is actually 1/4" thick, so I can make the groove with my plow plane.).  I know that many of you don't like this, but I think plywood has substantial advantages in this application--these drawers will be very solid.


Thursday, May 9, 2013

Stopped dados and runners

The shallow stopped dados turned out to be easier and quicker to create than I expected and they will definitely improve the chest.  My technique is to create a knifeline and then deepen it with a wide chisel on both sides of the dado.  Then I use my router plane to remove the rest of the waste to a uniform depth of 1/16".  I did get a painful lesson in the obvious:  it is very important to deepen the knifeline to full depth before turning to the router plane because the latter can pry out pieces from the sides of the dado if you don't.  Dumb.


I installed the front of the oak runners a uniform distance from the front edge with glue and a fixed screw.  My idea is that they will do double duty as drawer stops.  The back two screws are in elongated holes so the sides can move and the ends of the runners are shy of the rabbet for the back.  I think this will work well, but we'll see.


I decided that I would have (approximately) two 3" drawers, two 2 1/2" drawers and two 1 1/2" drawers.  The bottoms of the drawers are going to be in slips, and they will use up 1/2" of the depth.

I am still thinking about the drawer joinery.  My question is this:  Am I really going to create 6 half-blind dovetailed drawers for a tool chest?  I watched a video of Rob Cosman making one half-blind joint in seven minutes.  I am not that proficient at them and they would definitely take me a whole lot more time than that and possibly more than one try in some cases.  By the way, here are a pair of videos with some really innovative techniques for making half-blind dovetails that I ran across:

Half-blind dovetails, part 1

Half-blind dovetails, part 2

It would never have occurred to me to use a scraper and drill press this way.

Here's a thought.  I have no aversion to using quality baltic birch plywood for the drawer bottoms and there are obvious advantages to doing so.  They can be glued in solid and, in so doing, will add tremendous strength to the drawer.  On drawers this shallow, a glued-in bottom would take a lot of load off the corner joinery.  I am not sure that sides pegged in a rabbet in the front wouldn't be more than strong enough.  I admit to a vague feeling that they would be uncraftsmanlike.  A disadvantage is that this design requires making a rabbet on the edges of the undersized plywood so it will fit precisely into the groove.

What would you do?

Friday, May 3, 2013

Tool chest progress

So, I closed my last post with the observation that I hadn't cut dovetails in a while and that I should practice before beginning the case.  I was right.  Unfortunately, I ignored my own advice.  I wanted the dovetails to be nice and tight and, even though I know better, decided that a little encouragement with a mallet was in order. It wasn't.


The split wasn't clean, so I had to start over.  Of course, this was the last corner and I wasn't about to switch to pins first in the middle of a project, so my tool chest will now be 22" wide.  Actually, I think it will be better anyway, as it will fit on a 2' wide shelf unit I have.   That's my story and I'm sticking to it.

With just a couple exceptions on the first corner, the dovetails did come out tight, though not without an inordinate expenditure of time.  Conveniently, Shannon Rogers of The Renaissance Woodworker just did a nice podcast about fixing gaps in dovetails.


The only way I can get them real tight is to leave the pins very slightly proud and trim them to fit, which takes time.  As my sawing improves I cut closer and closer to the line, which makes things go faster.  I'm also very slow in chiseling out the waste so I don't disturb the knife wall.  I'm encouraged that speed is my challenge, which isn't a high priority anyway.  For the most part, it is just a matter of practice.

The old chest had dados on the sides of the drawers and runners fastened with brads to the sides of the chest.


Seasonal wood movement loosened the brads so that the runners sagged or came off.  Someone had made replacements for several of them and put staples in others to hold them.  Not a good arrangement.

I want to do my drawers this way, but there obviously has to be a better method for attaching the runners.  Screws in slots might well be OK, but I'm opting for belt and suspenders.  Unless one of you has a better idea, I'm going to create 1/16" stopped dados for the runners, glue one end and let the side move on screws in slots in the middle and on the other end of the runner.  Stopped dados take time, but I don't think ones this shallow will be too bad.  Six drawers, twelve dados.  Stay tuned.

Thursday, April 25, 2013

Machinist's tool chests, old and new

I inherited this machinist's tool chest from my father-in-law 25 years ago.  He was a frugal man and doubtless acquired it at a flea market for a few dollars, so it has more than paid for itself over the years but, truth be told, it is very poorly constructed.  Judging by how it's made, I suspect it was built in the fifties about the time Disston and Stanley tools were sliding downhill.  It has fallen apart numerous times and I have just banged it back together with a rubber mallet.


The joinery was accomplished with something like a drawer lock bit in a router or shaper and is wholly unsuited to the task.  Keep in mind this is 1/2" material:


The drawers are made the same way and then fastened together with brads.  The plywood panels on the front and back have completely delaminated and cracked.  Every joint has failed.  I long ago concluded that there was just no way to fix it.

I have been reluctant to start a major project because our house is on the market and we have to keep it ready to be shown at all times, so I was casting around for a smaller project and decided it was time to build a new chest.  Regardless of the poor condition of the one I have, I really like having it and find it very useful.  I think they are a nice complement to a traditional tool chest.  Experience has suggested some modifications to the design of my current one though.  First and foremost, I am going to build it to last.  If there is one place that seems especially suited for through dovetails, this is it.  By putting the tails on the sides, the joint mechanics will provide vertical strength.  I've also decided that I want to make it bigger.  My old chest is 12"x20"x8."  With a rabbet on the back, a groove for the front panel and knobs on the drawers, that means the drawers are only 5 3/4" deep, a real limitation.  I'm not going to be moving this chest around a lot and want lots of space, so I settled on 16"x24"x10".  In view of the larger size, I decided to increase the thickness of the case from 1/2" to 5/8".  Finally, I haven't found the half-width drawers to be advantageous so I am going to have all of my drawers full width.

It's time for true confession.  Since I unplugged my chopsaw, I have been able to make all of my cuts to length in my Millers Falls Langdon Acme miter box, an amazingly precise and quick machine.  However, today I discovered that the adjustment to increase the width of the board that can be cut has frozen.  I'll have to take it all apart to unfreeze it, so I decided to bite the bullet and saw the pieces out with the panel saw I restored and sharpened recently.  I attempted it first on a sawbench, which was an abysmal failure, so I tried it like Paul Sellers does with the board vertical, using the sideboard on my Nicholson bench:


The knifewalls minimized splinters and helped me get the saw started straight.  The cuts actually came out better than expected, mostly within 1/32".  I don't have a shooting board big enough for a 10" board so I had to plane it down exactly square in my Moxon vise, which was tedious but it worked.  If I do much of this, I'm definitely going to make a bigger shooting board.

How did I thickness the boards?  I flattened one side with planes and then ran them through the planer.  I also ripped them to width on my bandsaw.  These are two of the power tools I'm keeping, mainly because I'm lazy.

So, I'm  ready to go.  Every time I cut dovetails, I feel like I am starting over.  It's like a musical instrument:  you can't just pick it up once a month and expect to play well.  I probably should cut a few practice joints, but . . .


Thursday, February 14, 2013

An anarchist once more!

I have been chuckling all evening.  Let me explain.  I built my tool chest, the one described in this blog earlier, prior to the publication of The Anarchist's Tool Chest by Christopher Schwarz.  You may recall that mine is made primarily from Baltic birch plywood.  When the book came out, I was quite chagrined to read him making an emphatic case against plywood.  Here is an excerpt:
I don’t know about you, but I’ve developed a hate-hate relationship with sheet goods. . . .  [P]lywood has become so awful – warped, wet, full of voids – during the last decade that it is hardly worth the trouble. . . .  In 2008, I . . . decided I wasn’t going to ever work with plywood again. 
Christopher Schwarz. The Anarchist's Tool Chest (Kindle Locations 394-402). Lost Art Press LLC. 
It's true that he is only describing his own decision, but I found it quite absolute and doctrinaire, not in keeping with my understanding of anarchy.  The Baltic birch plywood I used was high quality, not wet, not warped and without noticeable voids.  I had the opposite problem:  I just couldn't find good quality wide pine boards to use.  Further, plywood has many attractive features for something like a tool chest.  It doesn't split or move with the seasons, for example.  The design I used permits using thin material.  It has drawbacks too.  It's not hand tool friendly and it isn't a traditional material.  All things equal, I'd prefer not to use it, but all things weren't and aren't equal.  Sometimes it makes sense to use plywood, but, on the other hand, there is nothing wrong with a decision to avoid it.  It's a personal choice.

Fast forward to today, when the very same Christopher Schwarz wrote a blog post entitled Screw this Anarchist's Tool Chest Stuff.  I'll let you read it for yourself.  But, guess what?  He is filming a DVD of making an anarchist's tool chest from--wait for it--plywood.  Not dovetails, screws.  And, he's strongly defending it as a decision that can make sense.  This reminds me of the song the British band played when Lord Cornwallis surrendered at the Siege of Yorktown:  The World Turned Upside Down.

While the case for a plywood tool chest is primarily one of expediency, there are other situations in which plywood is just plain better.  In fact, I encountered one this week and talked myself out of it.  I was making a small walnut and cherry box for my son's birthday.  I just am not comfortable with gluing on a solid bottom like Paul Sellers does, so I floated a solid wood bottom in a groove.  Since the corners are dovetailed, that requires making a stopped groove on two of the sides, a time consuming task that I accomplished with chisel and router plane.  I thought about gluing in a thin Baltic birch bottom on top of a mitered molding, but had this vague feeling that it would be wrong.  The advantage I see is that it would allow me to have very thin sides because the solid bottom would give the box stability and strength.  Birch looks nice and the edges aren't seen.

You can probably tell that I am defensive though.  It's the traditional material issue.  However, it doesn't take a lot of research to reveal that plywood, or at least laminated wood, is in fact a traditional material.  It has apparently been found in the tombs of Egyptian pharaohs and was used in 17th and 18th century English woodworking.

My problem with plywood is sawing it.  It will be interesting to see how Christopher Schwarz saws plywood for his tool chest.  I suspect he used power tools.  That's what I do.  Depending on the size of the piece, I either use a circular saw and a guide or I use my bandsaw.  So far the blades seem to stand up to it, although I don't use plywood often.

From one anarchist to another:  welcome home Chris.  This is probably the right place to tell you I am thinking of making another tool chest myself, this time from pine and joined with dovetails.  My advice to the rest of you if you are considering making a tool chest is, do as you like.  It's now clear that a case can be made for either approach.


Thursday, September 6, 2012

Tool chest hyperbole

Sorry to have disappeared.  As I will explain later, my workshop has been in storage for nearly 3 months.  During the hiatus, Dean called me out on this statement from my last post:
  I allow myself to think I came up with a unique and innovative idea for enhancing this chest.  In truth, I am sure it has been done before, but I can't recall seeing it anywhere.

So, I am now forced to justify my hyperbole.  As you may remember, this is what my chest looks like open:


Happy as I am with it, three issues occurred to me:

  1. When I transport the chest, the tills will slide back and forth;
  2. The space in front of the tills is wasted;
  3. I need a way to transport a few tools if I want to use them outside of the shop without moving the whole chest.
So, I had a brainstorm, triggered by memories of my grandfather carrying his hand tools to work sites, that could address all three of these issues simultaneously.  Here it is:


 Yes, I know, other than the fairly good dovetails, it's just a plain ole box.  Here is what it looks like inside the chest:


As you can see, it fits securely inside the chest and holds the tills closed.  It goes in and out surprisingly easily because the runners for the bottom till are narrower.  It just tips in place.

I am still thinking about what to place in it permanently.  I made a holder for my second set of chisels.  Handsaws fit and I think they might be a good choice.  Perhaps a bit and brace and a hand drill.  I'm thinking.

So, Dean, I am sorry to disappoint you.  All I can tell you is it works for me and I am very happy with it.

Finally, you may ask, how was it moving the box?  In two words, amazingly easy.  I have a utility trailer and I just rolled it in on 2x8 ramps all by myself.  I would have no reservation transporting this chest on a regular basis.

Of all the tool chests I have seen online, mine may be plainest and least reflective of craftsmanship.  I may someday build a second one that is.  For me, this was a design exercise with pure functionality in mind.  After a while, I will post how version 2.0 will differ, but for now I am extremely happy.  

Thursday, May 10, 2012

Tool chests Part 5

Most chests I have seen have removable tool storage above the bottom.  The Seaton chest has a beautiful till with many small drawers, but it just didn't seem like an arrangement that I would like to work from, so I settled on a set of large removable trays or drawers.  They telescope for easy removal.  My idea was that I would place them on my bench as needed.  In practice, I have never done that, not even once, because it is so convenient to access them in the chest.  It is also easy to get the tools from the bottom without removing the trays.


Quite frequently I slide one tray forward when I am working so two are accessible at a time, like this:


I did make trays within trays for my chisels and marking tools, thinking I would put them on my bench, but have not found them necessary and will be removing them.

I feel happy with the choice I made for the trays, though I continue to try different arrangements of the tools.  There is only one thing I would change.  My trays are 2, 4 and 6 inches deep, minus 1/2" bottoms.  I would deepen the chest and make the bottom tray 8".  I have found that a number of tools will almost but not quite fit well in a 6" tray.  The top two are fine.

Update:  Dean asks for the interior dimensions of the chest.  It is 20" high, 22" deep and 36" wide on the inside.  The lid is 2" deep.  If I had it to do over, I'd make it 24" high  to accommodate an 8" lower tray and a saw till like the Seaton chest.  That would let me make the top a flat frame and panel.

I have one more post on this chest coming, my big finish.  I allow myself to think I came up with a unique and innovative idea for enhancing this chest.  In truth, I am sure it has been done before, but I can't recall seeing it anywhere.  I hope you are intrigued.

Thursday, May 3, 2012

Tool chests Part 4

Planes and handsaws seem to be the most common tools stored in the bottom of tool chests.  Although I put my saws on the lid, I decided to leave room for a saw till, just in case.  So, as you see below, the space along the back is open for now.  Time to buy more tools.  If I had hollows and rounds, this would be a good place for them.

One of the interesting--and beneficial--aspects of building a tool chest is you have to decide what tools make the cut.  I own at least one of the following bench planes:  3, 4, 4 bevel-up low angle, 5, 5 1/2, 6, 7, as well as 2 block planes.  After giving it a lot of thought, I decided that I would do without the 3 and the 6.  I still own them and others, but I haven't used them.

Many woodworkers simply set their bench planes on the bottom, but I decided to make dividers.  I do intend to transport my tools in the chest and I also don't want to bang them into each other as I use them.  It was a simple matter to attach some (removable in case I change my mind) maple strips to the bottom.  I store my specialty planes and cabinet scraper next to them in the same manner--shoulder, router, cabinet scraper, plow.

Removing planes from the chest is a quick and easy one-handed operation accomplished without moving anything above them.  Many woodworkers are concerned about bending over, but you put one hand on the edge of the chest and reach down with the other to grab the plane.  It's very comfortable.

One comment you often read is that tool chests are too heavy to lift anyway, so the supposed advantage of chests in moving your tools isn't borne out.  I can go from having my chest fully loaded to what you see in the picture in less than one minute, and removing the planes would take a minute more.  I could easily load the chest into my pickup alone and replace all of the tools in short order, less than five minutes total.

You'll notice three rails along each side that get progressively narrower.  Stay tuned.


Wednesday, April 25, 2012

Tool Chest Links

Dean has been kind enough to try to provide a number of links to resources about tool chests in comments, but they don't appear for some reason. In edited form, they appear below.  From time to time, I'll add other links to this, so please let me know if you find something of interest.  I won't repeat links which I have posted earlier.

From Dean:

Replicating the Seaton Tool Chest by David Nelson – This is very detailed, and runs 23 web pages.
Note: From David’s web pages “Since the drawings I have did not show any detail of the saw till I used a drawing of the till on the Duncan Phyfe tool chest.” I’m hoping that the newly published Benjamin Seaton tool chest book will have these details.    Note from Andy:  The book on the Seaton tool chest to which Dean refers is this one. 

This is not as detailed as David Nelson’s web pages, but you can download the instructions at the bottom of the page which does have a drawing of the tool chest parts.

And don’t forget the Duncan Phyfe’s tool chest.
Measured drawings of Phyfe’s tool chest.

An interesting book section (only a short portion of the book is shown). Just scroll or page down until you get to page 28. Page 16 has two pictures of Duncan Phyfe’s tool chest.  Note from Andy: This is the book by Jim Tolpin which I referenced earlier and which I highly recommend.  Here is a link to The Anarchist's Tool Chest by Chris Schwarz as well. 


Thursday, April 19, 2012

Tool chests Part 3

Now comes the fun part:  thinking inside the box.  This is where the creativity and craftsmanship come into play.  Your chest should be customized to your tools, your way of working, your tastes.  My ideas and others you come across are suggestive only.

The lid.  Many of these chests have nothing on the inside of the lid.  If tools are stored there, it is most commonly saws.  The argument against it is that some of the historical chests have damage because the hinges and supporting structure couldn't support the load.  Admittedly that's an issue, but I just couldn't see leaving it unused because it is so convenient and accessible when the chest is open.  I avoided the potential problem by using a 36" heavy duty stainless steel piano hinge installed with 36 screws into hard maple.  It is very rugged and I haven't experienced any problems.


As you can see, I decided I would mount my saws under the lid and spent considerable time making secure ways to hold them.  I custom shaped inserts for the handles, which look nice but I will have to redo them if I change saws.  In use, I have found this a little cumbersome, though not bad.  I think there is a better way though.

When I was looking at historical designs, I was intrigued by the Benjamin Seaton tool chest.  I couldn't figure out how that saw till on the lid worked and that's why I went the route I did, but I think I may understand it now.  Basically it looks like saws are slid into sleeves from the sides.  They don't fall out because they are held in place by the sides of the box when the lid is closed.  If I had it to do over again, this is what I would do.  I also think that I would put my long handsaws elsewhere so I could have all of my other saws here.  As it is, my Japanese saws, coping saw and fret saw have to be stored elsewhere.  At some point I am going to rebuild the lid to accomplish this.

All in all, I think the decision to use the bottom of the lid for tool storage is a good one even if I didn't get it exactly right.  I understand the concerns about the stress on the hinges but think I found a solution.  Even if you don't like piano hinges, you can certainly find stout enough hinges and install them securely enough to avoid problems.

If you prefer to have your saws in a till, there are other possibilities for tool storage on the lid, limited only by your creativity.


Monday, April 16, 2012

Tool chests Part 2

Full size tool cabinet makers' tool chests were historically up to about 2'x2'x3'.  Quite commonly they were dovetailed boxes with a skirt around the bottom and a frame and panel lid.  Sometimes saws were stored under the lid, sometimes not.  Here is a Sketchup model of a smaller version of Chris Schwarz's design that will give you the idea, here is a blog about building one, here is The Woodwright's Shop episode on building one (1st of two) and here is a neat video of Chris Schwarz's in use.  Frequently they were made of pine because of its low cost, light weight and ready availability.  Traditional toolboxes are usually painted and fairly nondescript on the outside, though there are exceptions.

Modern woodworkers use all sorts of boxes.  The most unusual I have seen is Joel's from Tools for Working Wood in Brooklyn.  It is a steel jobsite box of the type used by carpenters, chosen in part for security.  Other woodworkers make a frame and panel box, this one with beautiful pecan panels:


I looked for pine and couldn't find any I liked, so I began thinking about alternatives.  I didn't think of a frame and panel design, which I really like.  What I settled on is economical, easy to construct, rugged and highly functional.  Many will not like it.  It is a maple exoskeleton lined on the inside with baltic birch plywood.  As you'll see later, I did put maple edges on the plywood to make it less obvious.  Although I have mixed feelings about this, it has served so well that I would do it again.  You'll notice that it is sitting on a dolly about 6" high made of construction lumber, which was intended to be temporary.  Since I planned to work directly from the box, I was concerned about bending over.  My plan was to make a drawer on casters to elevate the chest up to a comfortable working height.  In practice, I am very comfortable with it at this height.  If you want your chest higher, or if you need the space for storage, I still think this would be a good option.  My basic point is that you can have your chest at any working height you want.

The creativity and craftsmanship are on the inside.  That's next.


Thursday, April 12, 2012

Tool chests Part 1

Recently, Matt asked that I post about my tool chest.  I decided that I will write a series of posts about tool chests in general and include a description of my current prototype.

I should say first of all that I built mine prior to the publication of the The Anarchist's Tool Chest by Chris Schwarz, though I have subsequently read and enjoyed it.  I did read The Toolbox Book by Jim Tolpin, which I like because of the diversity of toolboxes it covers, both historical and modern.

I should also make clear that my primary goal is functionality.  I learned a great deal from reading about and seeing historical chests but, in the end, I built a practical user, definitely not a showpiece.  I think it's fair to say that mine is faithful to the historical concept of a cabinet maker's tool chest.  That's not to say that building a more historically accurate chest  is a bad idea, and in fact I admire many that I see, but I enjoy the creative challenge of adapting it to my preferences.  Do what you want.

The first issue I want to address is whether you should build a tool chest or wall cabinets, a subject that is hotly debated in forums.  My answer is yes.  Which you choose is a matter of personal preference, what tools you use, what your shop is like and other factors.  For many of us, the best answer is both.  Chris Schwarz, for example, has both.    It's flat silly to make this a global either/or debate.

If you want to see a great example of how functional wall cabinets can be, look at one of Bob Rozaieski's podcasts at The Logan Cabinet Shoppe.  He has a small, climate controlled shop with a wall behind his bench.  He can easily reach up and grab a tool and then quickly replace his tool when he is done with it.  All of his tools are instantly visible.  Bob did build a small tool chest for travel though, illustrating the value of having both.

I, on the other hand, work in a garage.  It is subject to wide swings in temperature and humidity.  My bench is under a large window.  To the right is a standard door and to the left is the garage door.  Wall cabinets would have to be mounted some steps away from the bench or I would have to have rolling cabinets.  I really like having all my tools no more than a step away in storage I can protect from the elements and move around easily.  A tool chest is the right solution for me and I hope never to be without one.  If my shop space ever changes though, I will probably build a small wall cabinet in addition.

There is, in my opinion, one reason for not wanting a tool chest that isn't valid for most of us:  that you don't want to bend over to access your tools.  I confess to being concerned about this myself but, in the event, it has proven to be unfounded.  I am a long way from being able to touch my toes and definitely don't like constantly bending over.  That's not a problem.  Convince  yourself with this experiment.  Put your largest plane on a platform 8" off the floor next to your bench.  Put one hand on the bench, reach down and pick up the plane.  If this bothers you, there are ways to make it easier.

These posts will be about a tool chest that is designed to hold substantially all of your hand tools.  In fact, one of the things that I decided going in is that a part of building a tool chest is that I would limit myself to a set of hand tools that would fit inside it.  That has been a very good thing.  I have sold quite a few tools and upgraded the ones I have.  It's a useful exercise and I like the discipline.  Historically, chests of this kind were about 2'x2'x3' and I have found that this is a good guideline.  It's big.  Assume for discussion that your wall cabinets are 6" deep.  You'd have to have 4 wall cabinets 2'x3' to get the same storage volume.  Not apples to apples, but you get the idea.